Monday, May 9, 2011

How to make artificial flower bouquets (nerdery optional)

One of my favorite details from my wedding was the fire & ice flower bouquets, inspired by Mario Bros.

PhotobucketPhotobucket
Photobucket

I can't claim originality on this one; the Weddingplans Livejournal community was one of my favorite sources of inspiration when I was planning, and the best idea that came out of that was raelja's fireflower bouquet!

PhotobucketPhotobucket

She made these for her wedding at San Diego Comic Con, and being a huge gaming nerd, I couldn't resist! Luckily she was very generous and let me steal her idea completely.

Even if you don't want to nerd out completely, this can be a great tutorial on how to make your own bouquets out of artificial flowers!

Supplies:

Photobucket
- Red and blue daisies (artificial) from Floral Supply Syndicate / Michaels / JoAnns / etc
- Wirecutters (to cut the stems to length)
- Leaves (artificial - if you can find ones with wires in them, it will make your life MUCH easier)
- Rubber bands, floral tape, ribbon & pins (to wrap the stems)
- White foamies (craft foam for the flower centers)
Photobucket
- Design Master Floral Spray in yellow and blue (flower centers - I used floral spray so it wouldn't stiffen the flowers. Normal paint is stiff & inflexible)
Photobucket
- Wall Pops! low-tack sticker paper (I was using these on glass for the centerpieces, so I wanted something low-tack. If you have no intention of disassembling it, then you can just paint it directly on)
- Feathers (I lined the bridal bouquet with feathers to differentiate it, and make it fancier)
- Glue

Red and aqua were my wedding colors, and to my relief (nerd alert) the new Super Mario Bros Wii introduced the concept of the ice flower. This solved my problem of being able to incorporate the both colors, as well as differentiate the bridal bouquet.

Instructions:
1) Cut the flowers to length and spray paint the centers yellow and blue accordingly. Alternatively, you can use two different colored foamies, just like the original inspiration bouquets. I chose to spray paint for more "realism"... well, as real as flowers with eyeballs can be!

2) Cut the foamie in a circle, one for each flower. cut the black stickers for eyeballs and stick them on.

3) Glue the foamie to the flower center. The surface won't be completely flat, so focus the glue on where the foam and flower contact, and find some sort of weight to hold them together as they dry.
Photobucket

4) Rubber-band the flowers together. Bend the wires in the flower stems so that the flowers face outwards as desired - I used 5 flowers for the outside circle, and one facing directly up.
Photobucket

5) Cut the leaves and pull them through the stems & rubber bands and arrange until they're pretty. I did not get leaves with wires in them, so my genius roommate attacked them with her hair curler on low heat to bend them. Without that, they were sticking up in the most unattractive way!
Photobucket

5.5) For the bridal bouquet, my roommate didn't use leaves and just used the feathers instead in the same manner, without the curling iron.
Photobucket

6) Wrap floral tape around the stems firmly. Then wrap your ribbon around the stems, inserting pins straight through to hold it in place. Make sure the pins are snug; you don't want to have them slip out of place and stab your bridesmaids! (The reference picture below isn't indicative of the bouquet stems - my bridesmaid is hiding an extra ribbon for the ceremony surprise)

Photobucket

All done! Your wedding has achieved nerd status!

Photobucket

Bridesmaid dresses - Mori Lee

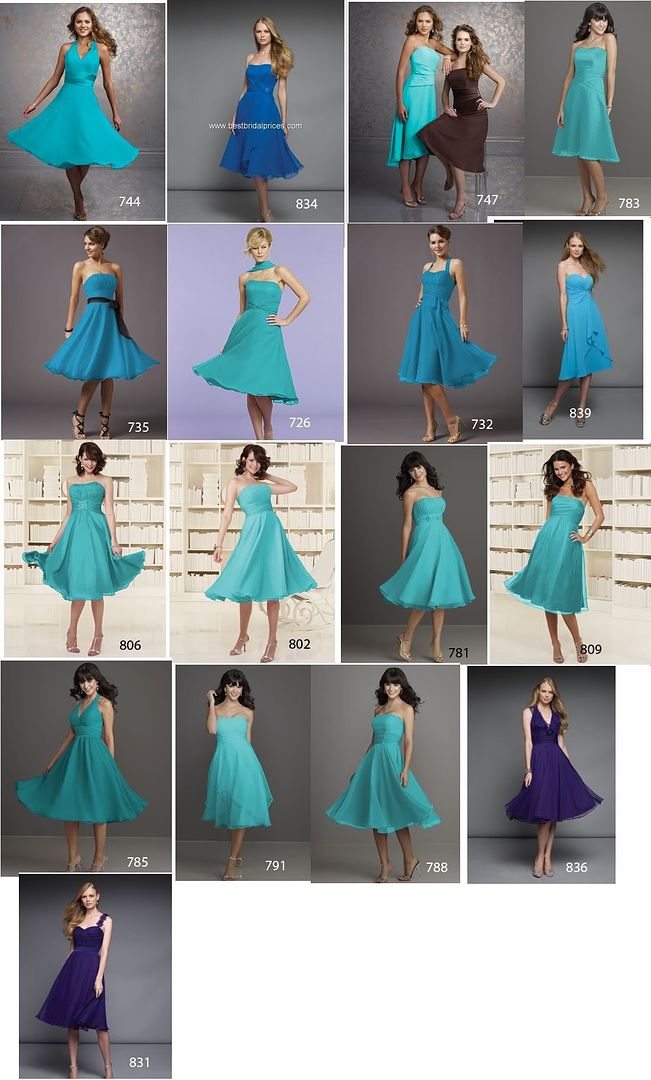
In my post Choosing Fabric for gowns, I posted images of the dresses we made for my bridesmaids. However, we certainly did our fair share of dress shopping beforehand to see what looked good on their bodies. We compiled images from Mori Lee's line in a helpful collage that I thought I would share! The numbers on the images correspond to the dress number in Mori Lee's catalog. I believe we specifically picked out gowns that were available in aqua, as well.

Photobucket

Click the image for a larger size!

Tuesday, February 22, 2011

Gifts details

Your wedding party is going to help you out so much during the wedding, so a great gift is essential! Here's a details post on the gifts I gave. I leaned towards the "custom" side for these. :)

Bridesmaids gifts: Three of the bridesmaids have been my closest friends since high school, so I had 10 years of photos to look back on. I made a photobook, organizing our photos by major trips and events and hobbies, and printed it at My Publisher. MyPublisher regularly has huge sales where you can save up to the cost of an entire book, so plan ahead! They have customized software that makes it easy to lay out the pages, but if you're Photoshop savvy, you can lay them out yourself (as I did). I think the books came out to be less than $30 each with the cost of one book deducted.

Photobucket

The books are very time-consuming, and I wanted to avoid making three different book layouts, so for my sister and best friend, I bought a photoframe with 12 spaces and framed pictures from our long histories together. I left a space open for a wedding picture that they could put in later.

Photobucket

Groomsmen gifts: Our wedding had lots of video game details, so we purchased custom Nintendo mushroom cufflinks from The Clay Collection on etsy. Great quality from her - we were really impressed! She was game to make some additional custom requests as well, and was super professional. The groom sported the green "1-Up" mushroom and the rest of the groomsmen got red mushrooms.

Photobucket

A veerrryy close runner-up for awesome groomsmen gifts were these awesome awesome awesome recycled art clocks from Pixel This on etsy.

Wedding favors: We celebrated both the groom and bride's cultures by pairing a selection of Polish chocolates and Taiwanese tea. The homemade tag requests that people enjoy them together and think of us (and also a friendly reminder to share their wedding pictures on our website)! They were bagged in little red netting drawstring bags with prints of a Chinese bride and groom. My parents bought the bags in Taiwan.

Photobucket
Photobucket

Side note: wedding favors are a great way to get your wedding party involved. There's not much that you can hand off for your wedding, but this is a wonderful task to give to eager families who want to help. Our parents took care of the research and purchasing of the favors for us. We took care to keep it under $2/guest.

Parents gifts: We gifted our parents after the wedding with large canvas prints of our family pictures from the wedding. Canvas print were courtesy of Costco and they were GREAT quality. A little pricey but they'll last a long time.

No pictures unfortunately, we had them shipped directly to our parents!

Wednesday, October 13, 2010

Budgets: save/splurge?

Budgets are the biggest part of wedding planning, and there are about 10,000,000 ways it can blow up in your face. Here's my personal list of things that I saved money on and things that I chose to splurge on. It'll be different for you, but hopefully this will get you thinking about where you can make tradeoffs with your own budget!

Where did I save the most money with my wedding?
1. Guests- I was really heavyhanded in controlling the guest list. Most people didn't get +1s, and only the closest family and friends were there. Think about it this way- would these people invite you to their wedding? Do they invite you to their birthday parties? Depending on how much your per person cost is, the difference between 10 additional guests can be like $1000!
2. Flexibility with date- My biggest surprise; I didn't think date would be our biggest bargaining tool. Wedding venues tend to book 12 months out, so they're able to look ahead and see when the dead times are. Not having a date booked at all is a loss for the venue, so if they can slot you in, they'll be happy to make compromises and throw in extras. We ended up getting a ton of extras, and a winter rate outside of the normal winter dates. We also got a Sunday rate too.
3. Not hiring a coordinator- I have no regrets about not hiring someone to help plan, but I actually think we should have hired someone for the day-of work (even if it's like $1000 at least). The peace of mind that comes with just letting someone else take care of all the dirty work is worth it. I was incredibly lucky that my amazing friends stepped in to help.
4. Venue decor- I deliberately picked a place that was gorgeous all on its own, with required minimal decor. I bought chiffon to decorate the arch/aisle, made my own centerpieces, made artifical flower bouquets, and just bought loose rose petals to scatter. It looked amazing. Did not care about special tablecloth or chair covers and the like. I also asked friends and family to help decorate.
5. Bridesmaids dresses- While I didn't pay for these, we knocked the cost down from $150+ per BM to about $20 per BM by making the dresses ourselves.
6. Invitations- we did electronic self-designed Save the Dates, and then bought raw paper and made all the invitations ourselves.
7. DJ/videographer- we deliberately didn't find the highest quality out there for these vendors. We looked at the price we wanted, and then found the best quality FOR THAT PRICE. You will always find more expensive people who are better, but that doesn't mean you need to hire them! This was our compromise for hiring the BEST photographer.

What was the most expensive? What broke the budget?

1. Dress- ended up being more expensive than I wanted. Like the venue, you just have a certain level of fanciness that you're going for. If you can compromise for something a little less nice, you're good, but otherwise, you're looking at $400 minimum up to thousands for your dress. The average price for the styles I liked were around $1000. There's the option to rent as well.
2. Photographer- We fell in love with Ryan Brenizer right off the bat, and we never looked back. He's worth much more than he charges!
3. Makeup- paid a lot more for makeup than I wanted, since I changed plans last minute. But it turned out really nice! It would be cheaper to have friends help, but it's nice to be pampered and have your girls all in a room doing makeup.
4. Venue- the venue is always the most expensive chunk of the wedding, and we definitely found less "fancy" venues for cheaper out there. Ultimately, Calamigos was not as expensive as it COULD have been, but we decided that this was the perfect intersection of how much we were willing to spend for the amazing quality.


The bottom line is- ALWAYS bargain and ALWAYS ask what people can do to make things cheaper. In general, people didn't change the raw price as much as just add in extras for the same price. Think about what REALLY matters to you the most (usually it's photography), and then force yourself to set a reasonable price for the rest. You'll always be tempted to spend more because there is an endless amount of vendors out there, but stick to your guns!

Sunday, October 3, 2010

Save the Dates

Work is eating me alive, but I still want to share everything from my wedding! Maybe I'll just post in small chunks!

Here are our save the dates, designed by the groom. We sent it out electronically to save on postage! The silhouettes were created from a photo of us, which the groom edited in Photoshop. (For the more Photoshop-inclined, he just lassoed the outlines of us in the photo and blacked it out.)


Basically, you paste the image directly into the e-mail and hyperlink it to your website. There are tons of really great tutorials already on how to do this, so I'll just link you to this one!

Electronic Save-the-Dates For Dummies, by Mrs. Daffodil on WeddingBee

Sunday, June 6, 2010

Choosing fabric for gowns

After writing my last entry on downtown Los Angeles's Jewelry / Diamond District, I realized that I've seen a lot of questions on fabric floating around the internet for brides-to-be. I've been sewing for over 10 years, so analyzing fabrics as well as cruising around LA's fabric district was easy for me. So I thought I'd write a two part series on (1) fabric for people ambitious enough to make/commission their own bridal or bridesmaids gowns and (2) LA's fabric district! For my wedding, I used fabrics to decorate the archway & aisle, and for the bridesmaid gowns.

So, here goes:

Part 1: Sewing / commissioning clothes for your wedding

You will be in for extreme sticker shock when shopping for your bridal and bridesmaids gowns. $400 is "cheap" for a bride, and from there it soars up easily into the thousands. And for bridesmaids, chances are you're looking at about $130 or so, even for dresses that are pretty simple.

Ways to save money on this are:
(1) Buying matching dresses from a normal retail store- however you'll be extremely limited on colors. So if you're looking to match your color scheme, good luck! We went with aqua for the dresses, and were not able to find anything suitable. You can also go with a color "hue" and have your girls buy their own dresses, but make sure you look up pictures of this happening at other weddings to see if it's something you like or not. (It wasn't for me.)

(2) Commissioning a PROFESSIONAL. This does not include a best friend, parent, grandparent, relative, or anyone else you personally know. Only professionals will be able to deliver on-time and without a lot of micro-management on your part. Make sure you find someone reliable whom you know can deliver and will do multiple fittings on your bridesmaids.

(3) MAKE your own gowns. This will drive your cost down considerably; for example, we were looking at gowns that were about $130 BEFORE alterations. After deciding to make the dresses ourselves, the price ended up being about $20-30 each for fabric, patterns, and notions (zippers, thread, etc).

If you're going with the third route, you need to be hyper aware of the fact that it's going to be stressful. Even with 3 out of 5 of my bridesmaids being experienced seamstresses, there was still last minute sewing up until the morning of the wedding. It just takes time, and with everything else that needs to get done for the wedding, it's a lot of additional work. Prior to this, I would recommend having your bridesmaids try on a bunch of pre-made gowns in order to see what styles work on them best.

That being said, it's time to choose fabrics! Here's a quick rundown of a few "bridal" fabrics:


1) Chiffon: Sheer, soft layer that drapes nicely. There are different qualities to chiffon, with some being better woven or softer than others. Make sure you drape the chiffon over the lining fabric and see it in natural light, indoor light, and in photographs before picking your fabric.
- Good: Pretty, fits well in a wedding setting
- Bad: Frays easily, needs to be sewn with particular attention to seams since it's see-through. Seams can also cause the fabric to tear if not sewn properly. Requires a lining layer.

2) Satin: Pretty, all-purpose fabric. Ranges from extremely shiny to totally matte and everything inbetween. There are a LOT of different types of satin, so make sure your fabric texture and weight matches the style of the dress (e.g. don't choose a heavy fabric for light, poofy, airy dresses)
- Good: Bridal satin (super thick, high quality satin)
- Bad: Crepe-back satin (this is satin backed with crepe, which makes it very slippery and more challenging to sew. It's also worse at holding a shape), baroque satin (so shiny that it looks cheap, also needs a lot of ironing).

3) Taffeta: Plasticy, thick fabric used in a lot of gowns. Not as soft to the touch, but popular and pretty solid.

4) Organza: I don't have a lot of experience with organza, but to me it's like the rich man's version of chiffon. Light, airy, see-through, it drapes beautifully and is soft to the touch.

A lot of your decision should hinge on:
(1) Sewing expertise - don't pick something slippery, thin, see-through, tight-fitting, or challenging if you aren't experienced! The flaws will show, and you want everyone to look great on your wedding day.
(2) Body type - Pick something with a flattering fit for your bridesmaids. Where the hems fall and how they emphasize each girl's body is very important!
(3) Weather - is it going to be hot or cold out? Pick a style that won't leave your bridesmaids freezing or sweating!

For short gowns without a lot of gathering, you can get away with 3-4 yards easily per layer, but in general just follow the fabric recommendations on the back of your pattern. DO NOT FORGET to check the fabric width - generally everything is either 45" or 60". This makes a HUGE difference! And while you're at it, buy lots of extra no longer at the store!

Lastly, as for patterns, Simplicity, McCalls, Vogue, and Butterick are all readily available at fabric stores and have a good variety of styles to choose from. If you live near a JoAnn's, make sure to hit up the store when they're having their 99 cent pattern sales (nearly every month). Otherwise they'll run you $10-15 EACH!

--

What did we end up doing for my wedding? We chose the following dresses, with an aqua satin underneath a aqua chiffon overlay, and red chiffon wraps/accents:


And this is what they ended up looking like!


My maid of honor's dress (third from the left) is the only one purchased out of the group. Like I said, you'll fall victim to the trap of not getting things done on time. Luckily she was the MOH and so could have something slightly different!

Next up, a guide to downtown LA's fabric district!

Sunday, May 9, 2010

Wedding ring shopping in downtown Los Angeles

Wedding ring shopping in downtown Los Angeles

Photobucket

To anyone who may be reading this and does not live in driving distance of Los Angeles, I apologize for the envy that this post may cause!

Downtown Los Angeles is crisscrossed with one-way streets, smog, hobos, and best of all, tons and tons of specialized shopping districts that sell everything you'd need for a wedding at wholesale cost. This includes the fabric district, flower district, jewelry district, wholesale crafts, seamstresses, and other stores that sell feather, beads, toys, veils, petticoats, lingerie, clothes, sunglasses.. you name it!!

The jewelry district is a FANTASTIC place to shop, as it is littered with 15+ story buildings packed with jewelry shops on every floor. The prices are unbeatable, and you can buy anything from rings you see at Robbins Bros, to loose diamonds, to custom created pieces. You can even have your existing rings redesigned!

First and most importantly, RESEARCH before you go. There are HUNDREDS of jewelry shops, and after awhile they all look the same. And how do you really know that what you're looking at is real gold, or even real diamonds? The best way to get around this is to go with a trusted vendor. Google and Yelp are your best friends! It's also great to visit a Robbins Bros or other chain to get an idea of what you like first. It'll also give you a better appreciation of how much money you're saving!

Here are the places I visited (parking at Pershing Square):

(1) Bridal Rings Company - My favorite of the bunch. Really professional store with great prices and selection. It's Robbins Bros-ish in that a sales person generally gets assigned to help you, but they don't pressure you at all. They're more than happy to give you any information you need and have you come back later. They can also customize something to order. At this moment, there's a Yelp discount for 5% or $50 off. Yelp link

(2) Icing on the Ring - A wide variety of rings on display - traditional bands, rings with various stones, white/yellow gold fused bands, non-traditional bands with interconnected leaves/flowers, etc. They gave some really great practical advice - I was really interested in the bands with leaves and flowers, but they were very honest in telling me that rings like that don't last as long as traditional bands, especially if I was rough on my rings (and I am!). Yelp link

(3) Eli's Jewelry - Fantastic family run store. They had a good selection, but the true differentiator of Eli's was the beautiful custom design work that the sons of the family do. While we were shopping there, one of the sons showed us his handiwork on a engagement ring and wedding band set. It was meticulously designed and beautifully crafted, with each angle of the band taken into consideration. We were really impressed and will definitely come to Debebians for a custom piece (or to add on to my engagement ring for a future anniversary) in the future!Yelp link

(4) Debebians - The people who helped us at Debebians were GREAT - young, friendly, and professional. At the time, they didn't have a store yet, so they were totally happy with us sending in a whole list of rings we wanted to see. When we went in to their office, they had all the rings in a little display tray in the proper sizes, and they were so nice and accommodating. We did try to get a customized ring from them, however, and whether it was the fault of us not drawing out a detailed diagram of what we wanted or their own quality issues, it didn't come out as expected. However, they were totally willing to rework the ring as much as needed, and in the end gave us a full refund with no hassle because it just didn't match up to our specifications. I honestly DO recommend them for their quality and selection, however. They had a lot of rings that we had seen at Robbins Bros for a lot cheaper.

(5) Titanium Kay - GREAT selection. They had a ton of men's rings that we had not seen anywhere else, and we looked all over! The salesperson who helped us was not great at English, but they were really organized in that we brought in a list of rings we liked from their website and they pulled each one for us to examine. Yelp link


Tips:
1. Plan your trip by researching trusted vendors, and make a list of places & addresses to go. I wouldn't recommend just dropping in without at least a starting point. Once you're there, feel free to wander in to stores that catch your eye, but remember that you're doing so without a good idea of if they're legit!
2. Ask how you can make a particular piece of jewelry cheaper. Everyone I spoke to was more than willing to quote prices based on changing out the metal, or removing the engraving, or a variety of other options.
3. Check if they have a service plan for cleaning or resizing!
4. Offer to pay in CASH. A lot of vendors will comp the tax.
5. If you plan to customize a ring, get detailed information on how the vendor goes about making the actual ring. For instance, will they show you a drawing? Will they make a 3D model on a computer, and then a wax/plastic version for review before casting the actual ring?
6. Take a photo of the rings on your fingers. Even better if you can put a few different rings on your fingers and have them all in one photo! Like so! Isn't it a nice and easy comparison?
Photobucket
7. Bring a notebook and write down EVERYTHING - price, style #, designer, diamond size, etc. You'll see so many that you'll just forget.

As for me, I did the rounds at Robbins Bros and a few other stores before going downtown. The rings we ended up are:

Engagement ring (purchased online at Blue Nile): Heart-cut diamond on a white gold band
Bride's ring (first seen at Bridal Rings Company but bought elsewhere): Infinity band with pave set diamonds, white gold
Groom's ring (purchased at Robbins Bros): White gold with rectangular cutouts, designed by Frederick Goldman

Photobucket
Photobucket

Lastly, here's a very approximate map, including where I parked and the 5 stores named above. HAPPY HUNTING!

Photobucket