Monday, October 24, 2011

Astrobright lunar blue envelopes - $15 per 100!

I'm selling my leftover envelopes! I have 300+ envelopes available in Astrobright lunar blue in #10 size (4 1/8" x 9 1/2" - standard letter size).

Will sell in lots of 100 each at $15 each, not including shipping. Shipping will be an additional $5 per 100 envelopes.

These are brand new and in pristine shape. Comes from a smoke-free home! Ships promptly from southern California!

They are quite lovely and eye-catching. I used them for invitations and thank you notes and I was very happy with them!

Comment below or email me at krazy2wedding(at)gmail.com!

Tuesday, October 4, 2011

Venue detail - Occasions at Laguna Village, Laguna Beach, California

I'm really happy that my overview post on Southern California oceanfront wedding venues seems to be a great resource for planning brides! In light of that and the pictures on my harddrive sitting around gathering dust, I thought I would post more thorough reviews and pictures of the wedding sites that I visited. When I was planning, I wanted to see the sites from every possible angle before visiting. And it always ended up feeling/looking different from the photos when I visited. So I thought I'd share some of that with you!


Overview: A gorgeous venue in Laguna Beach that plants you right on top of the ocean. No beach and sand in front of you, just waves out to the horizon.

Details: Completely outdoors. Max of ~175 people.

Packages: All inclusive, even things like DJ, cake, centerpieces, parking lot, coordinator, favors, and table umbrellas. Things that AREN'T included are drinks, personal flowers, photographer, and officiant.

Costs: $130-230pp BEFORE drinks/bar and site fees. Site fees range from $1,500-$4,800 depending on time of day/week.

Other: You can do ceremony-only or reception-only packages. Also, I can't remember what they do in the event of rain. Your tables all have umbrellas, and I'm sure I asked, but I can't remember! Rain is uncommon but always a possibility, so make sure you check weather forecasts and ask!

Bottom line: It's the most gorgeous ocean venue you could really find, with the ceremony and reception on a patio literally on top of the ocean. Surprisingly, it was not immediately out of reach as far as pricing goes, but it was still more than we were willing to go over our budget. Their package was all-inclusive all the way down to the cake and favors, so that is super convenient for someone who doesn't want to shop around. However, I knew my wedding was going to be crazily customized, so even though they try to allow as much customization as possible, it wouldn't have worked for me. Had I been willing to go over-budget and give up a lot of customization, I would have gone with Occasions for sure.

Pros:
- The view is breathtaking, especially at sunset. You won't find a venue like this anywhere else! All other ocean-front venues are either further away from the ocean, or on the beach itself, or marry you on the ocean and then put you in a windowless reception venue.
- Venue is very fancy. It feels like a fairytale!
- Packages are very convenient and nearly all-inclusive. Takes a lot of pressure off from finding your own vendors.
- One on-site bridal waiting room, which is small. One party will have to get ready somewhere else!
- You can go down to the sand for wedding photos!

Cons:
- Windy, cold, and high potential to be overcast. (Same for all ocean-front venues)
- No private parking lot, but a closeby (walking distance) lot is included in the fee.
- Packages include nearly everything without too much wiggle room. For example, you can customize the look of your favors, but they have to be molded chocolates.)
- Pricey
- Heat lamps are an additional cost, if necessary
- There's a restaurant with an outdoor dining area that overlooks the venue. (See photo) So you will have random people watching your wedding from above. Other than that, it's private.
- Weddings all have to end by 10pm at the latest, due to Laguna Beach city law. However, there is a bar upstairs that is open later!
- Four hours total for ceremony & reception.

(DISCLAIMER: All my information is from 2009. So obviously things may have changed since then!)

Photos:

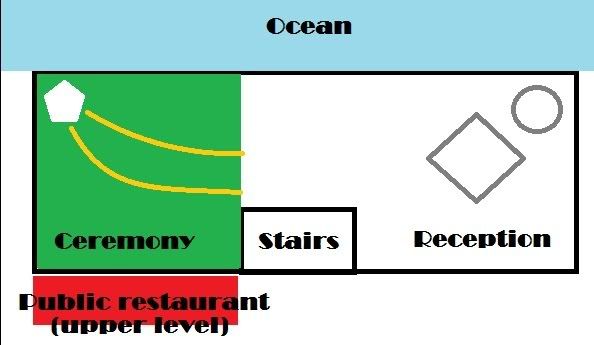
To help orient you for these photos, here's a professionally produced floor plan:
Photobucket

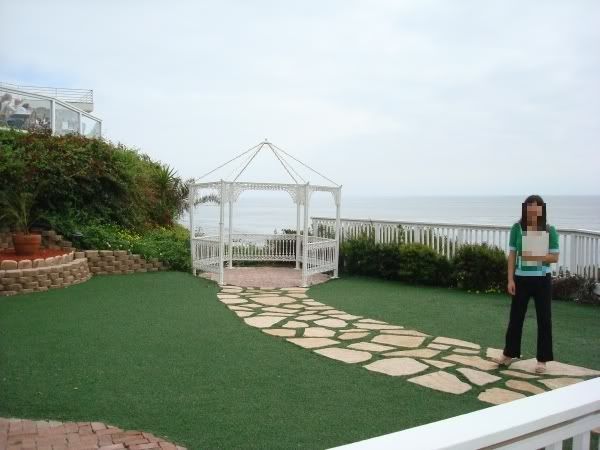
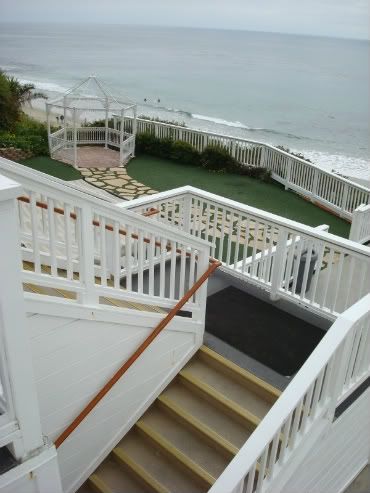
On the left is your ceremony with gazebo and astroturf! Chairs are set right on the grass. (I think if you're over a certain guest count, they'll actually set up the aisle in the reception area and then clear it for tables.)
Photobucket

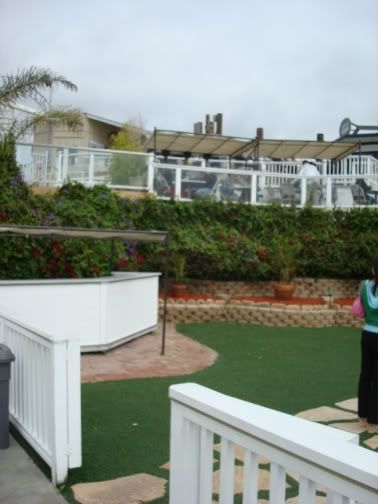
To the left of the previous photo, you can see how close the people eating at the restaurant will be to the ceremony. (To the left is the bar.)
Photobucket

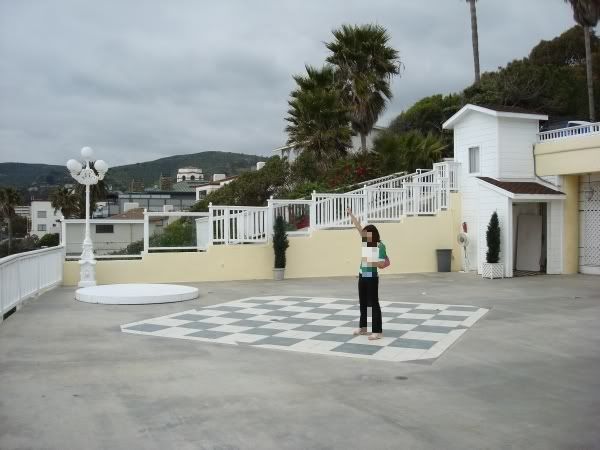
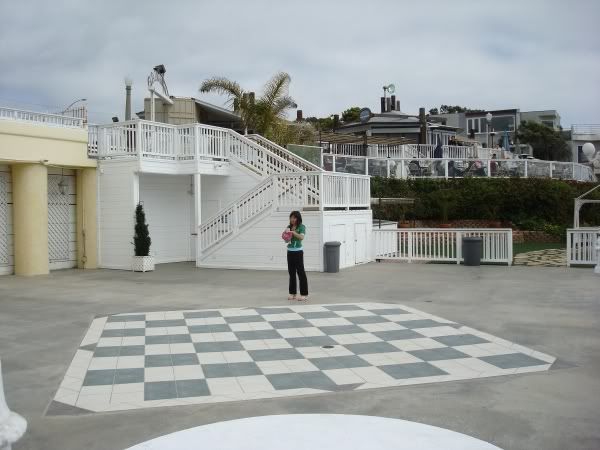
To the right of the venue, the main reception area.
Photobucket

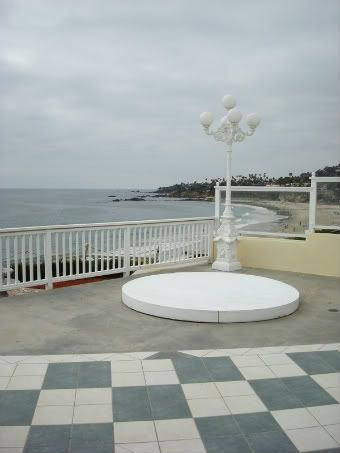
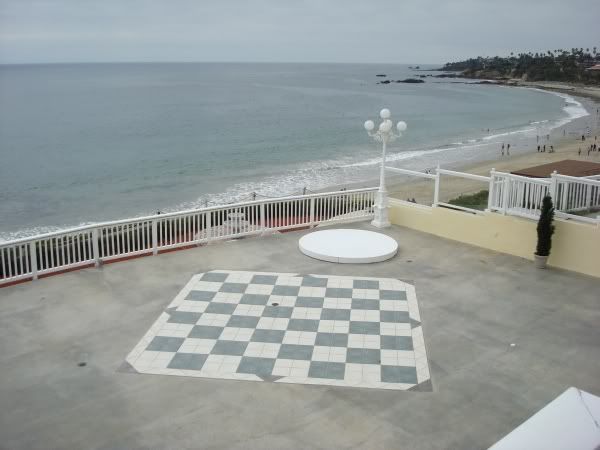
View from the circular platform of the reception area, looking the other way. Note the stairs in the back - the guests and wedding party has to come down these steps. There is a handicap elevator.
Photobucket

View on an overcast day!
Photobucket

Overhead view of reception area. When you're at ground level, you can't really see people on the beach unless you look over, which is nice.
Photobucket

Closeup view of the steps, also overlooking the ceremony site.
Photobucket

See more photos of live weddings, here!

Got questions or corrections? Comment below!

Monday, August 8, 2011

Day of schedule

Now that all your wedding details and vendors are planned out, what are you and your guests actually doing on the day of? Here's the schedule that I used, and my thought process behind it!

My setup:
- Total venue time was 6 hours, not including vendors being able to come 3 hours early.
- My hotel was a 20 minute drive from the venue
- My bar package included only 3 hours of bar time
- We had makeup artists doing makeup for the bride and 6 bridesmaids/mothers.
- We estimated a 30 minute ceremony at most, if not shorter.

Time

10:00 AM

Bridal party & moms start on makeup at hotel

1:30 PM

Bridal party leaves for venue (20 minute drive)

2:00 PM

Bridal party, groomsmen, helpers arrive at venue to set up and get dressed

Photos (2 hours)

2:30 PM

Wedding party shoots with photographer

4:30 PM

Wedding party finishes shoot and retreats back to room to relax

Ceremony

5 or 5:15 pm

Start ceremony no later than 5:15pm, but can start earlier than 5:15pm if ppl have all arrived. Venue ceremony coordinator to cue.

5:45 or 6 pm

Ceremony ends.

Cocktail hour

6:00 PM

Bar opens and cocktail hour begins

6:30 PM

Grand Entrance (Bridesmaids & Groomsmen, Bride & Groom)

6:35 PM

Polish bread greeting

6:40 PM

Bride's dad to toast

Dinner (1.5 hours)

6:45 PM

Dinner to start

7:15 PM

Bride & groom to toast tables

7:45 PM

Slideshow

7:50 PM

Groomsman toast

8:00 PM

Groom's dad to toast

Dancing (1.25 hours)

8:15 PM

First dance / surprise groomsmen and bridesmaid dance / segue into general dancing

8:45 or 9 PM

Bar ends (3 hours after start)

9:30 PM

Break dancing. Bride and groom thank guests

Cake cutting

Bouquet toss

Garter removal

Garter toss

Dancing part 2 (0.5 hours)

Resume dancing after finished

10:25 PM

Last Dance

10:30 PM

Music off

11:00 PM

Venue begins to break down


Things to watch out for:
  • Make VERY sure, and I mean confirm it verbally, that someone is keeping a timetable for you (most likely your coordinator or DJ host). You do not want to think about a schedule when it's your wedding!
  • Be very aware of how often you're interrupting the flow of events for "everyone has to pay attention to the bride/groom" moments. This is why we did our first dance and then went straight into the open dance floor. Other weddings had the bride and the groom play games to entertain the guests during dinner, but it kills conversation.
  • On the other hand, make sure there aren't long amounts of dead time! Give your guests enough time to enjoy their food and talk to each other at their tables, but don't make them wait after they're done!
  • I had 5 hours and 130 guests, which was not enough time to see and talk to everyone. I really could have gone all day. ;)
  • Due to our limited time schedule, we didn't do any newlywed games. I've really enjoyed watching these at other weddings, though!

Where did we go off-schedule?
  • We started our wedding party photos late because getting dressed at the actual venue took longer than expected, with 5 bridesmaids and 1 bride getting ready. (Fun fact: the bride was ready faster than the bridesmaids! :) )
  • Toasting tables will take much longer than you think!

Monday, July 25, 2011

Centerpiece inspiration

For the longest time, I was obsessed with having manzanita branch centerpieces. They're elegant, beautiful, and so versatile! I ended up having a fit of inspiration thanks to a random comment from my sister, so I made Mario mushroom centerpieces (more on that later), but I did so much research on manzanita branches that I thought I would share.

Vendors:
- Floral Supply Syndicate
- Save on Crafts
- Blooms and Branches - If you are in southern California, I heard rumor that you can pick out branches in person with this vendor.

Breathtaking, dramatic red branches with red danging orchids in black eiffel tower vases. I became obsessed with this, and very nearly copied it for my own wedding.
Photobucket


One thing to keep in mind is not blocking the view for guests across the table. A tall or see-through arrangement is good for this!
Photobucket


Sparse, to emphasize a forest theme.
Photobucket


Lit candles in the branches is just magic.
Photobucket


Paper flowers can be a big cost saver, and great DIY touch!
Photobucket


Dangle crystals from the branches for a classy and dreamy affair.
Photobucket


Photobucket


Varied branch colors make this wedding extremely classy.
Photobucket


Flowers, candles, and crystals give this centerpiece a princessy feel.
Photobucket


The fuschia colors pop against the black for a classy look.
Photobucket


Photo sources: The Knot, Reversed Lens Photography, Jennifer Skog photography, Caroline Tran photography

Monday, May 9, 2011

How to make artificial flower bouquets (nerdery optional)

One of my favorite details from my wedding was the fire & ice flower bouquets, inspired by Mario Bros.

PhotobucketPhotobucket
Photobucket

I can't claim originality on this one; the Weddingplans Livejournal community was one of my favorite sources of inspiration when I was planning, and the best idea that came out of that was raelja's fireflower bouquet!

PhotobucketPhotobucket

She made these for her wedding at San Diego Comic Con, and being a huge gaming nerd, I couldn't resist! Luckily she was very generous and let me steal her idea completely.

Even if you don't want to nerd out completely, this can be a great tutorial on how to make your own bouquets out of artificial flowers!

Supplies:

Photobucket
- Red and blue daisies (artificial) from Floral Supply Syndicate / Michaels / JoAnns / etc
- Wirecutters (to cut the stems to length)
- Leaves (artificial - if you can find ones with wires in them, it will make your life MUCH easier)
- Rubber bands, floral tape, ribbon & pins (to wrap the stems)
- White foamies (craft foam for the flower centers)
Photobucket
- Design Master Floral Spray in yellow and blue (flower centers - I used floral spray so it wouldn't stiffen the flowers. Normal paint is stiff & inflexible)
Photobucket
- Wall Pops! low-tack sticker paper (I was using these on glass for the centerpieces, so I wanted something low-tack. If you have no intention of disassembling it, then you can just paint it directly on)
- Feathers (I lined the bridal bouquet with feathers to differentiate it, and make it fancier)
- Glue

Red and aqua were my wedding colors, and to my relief (nerd alert) the new Super Mario Bros Wii introduced the concept of the ice flower. This solved my problem of being able to incorporate the both colors, as well as differentiate the bridal bouquet.

Instructions:
1) Cut the flowers to length and spray paint the centers yellow and blue accordingly. Alternatively, you can use two different colored foamies, just like the original inspiration bouquets. I chose to spray paint for more "realism"... well, as real as flowers with eyeballs can be!

2) Cut the foamie in a circle, one for each flower. cut the black stickers for eyeballs and stick them on.

3) Glue the foamie to the flower center. The surface won't be completely flat, so focus the glue on where the foam and flower contact, and find some sort of weight to hold them together as they dry.
Photobucket

4) Rubber-band the flowers together. Bend the wires in the flower stems so that the flowers face outwards as desired - I used 5 flowers for the outside circle, and one facing directly up.
Photobucket

5) Cut the leaves and pull them through the stems & rubber bands and arrange until they're pretty. I did not get leaves with wires in them, so my genius roommate attacked them with her hair curler on low heat to bend them. Without that, they were sticking up in the most unattractive way!
Photobucket

5.5) For the bridal bouquet, my roommate didn't use leaves and just used the feathers instead in the same manner, without the curling iron.
Photobucket

6) Wrap floral tape around the stems firmly. Then wrap your ribbon around the stems, inserting pins straight through to hold it in place. Make sure the pins are snug; you don't want to have them slip out of place and stab your bridesmaids! (The reference picture below isn't indicative of the bouquet stems - my bridesmaid is hiding an extra ribbon for the ceremony surprise)

Photobucket

All done! Your wedding has achieved nerd status!

Photobucket

Bridesmaid dresses - Mori Lee

In my post Choosing Fabric for gowns, I posted images of the dresses we made for my bridesmaids. However, we certainly did our fair share of dress shopping beforehand to see what looked good on their bodies. We compiled images from Mori Lee's line in a helpful collage that I thought I would share! The numbers on the images correspond to the dress number in Mori Lee's catalog. I believe we specifically picked out gowns that were available in aqua, as well.

Photobucket

Click the image for a larger size!

Tuesday, February 22, 2011

Gifts details

Your wedding party is going to help you out so much during the wedding, so a great gift is essential! Here's a details post on the gifts I gave. I leaned towards the "custom" side for these. :)

Bridesmaids gifts: Three of the bridesmaids have been my closest friends since high school, so I had 10 years of photos to look back on. I made a photobook, organizing our photos by major trips and events and hobbies, and printed it at My Publisher. MyPublisher regularly has huge sales where you can save up to the cost of an entire book, so plan ahead! They have customized software that makes it easy to lay out the pages, but if you're Photoshop savvy, you can lay them out yourself (as I did). I think the books came out to be less than $30 each with the cost of one book deducted.

Photobucket

The books are very time-consuming, and I wanted to avoid making three different book layouts, so for my sister and best friend, I bought a photoframe with 12 spaces and framed pictures from our long histories together. I left a space open for a wedding picture that they could put in later.

Photobucket

Groomsmen gifts: Our wedding had lots of video game details, so we purchased custom Nintendo mushroom cufflinks from The Clay Collection on etsy. Great quality from her - we were really impressed! She was game to make some additional custom requests as well, and was super professional. The groom sported the green "1-Up" mushroom and the rest of the groomsmen got red mushrooms.

Photobucket

A veerrryy close runner-up for awesome groomsmen gifts were these awesome awesome awesome recycled art clocks from Pixel This on etsy.

Wedding favors: We celebrated both the groom and bride's cultures by pairing a selection of Polish chocolates and Taiwanese tea. The homemade tag requests that people enjoy them together and think of us (and also a friendly reminder to share their wedding pictures on our website)! They were bagged in little red netting drawstring bags with prints of a Chinese bride and groom. My parents bought the bags in Taiwan.

Photobucket
Photobucket

Side note: wedding favors are a great way to get your wedding party involved. There's not much that you can hand off for your wedding, but this is a wonderful task to give to eager families who want to help. Our parents took care of the research and purchasing of the favors for us. We took care to keep it under $2/guest.

Parents gifts: We gifted our parents after the wedding with large canvas prints of our family pictures from the wedding. Canvas print were courtesy of Costco and they were GREAT quality. A little pricey but they'll last a long time.

No pictures unfortunately, we had them shipped directly to our parents!