Budgets are the biggest part of wedding planning, and there are about 10,000,000 ways it can blow up in your face. Here's my personal list of things that I saved money on and things that I chose to splurge on. It'll be different for you, but hopefully this will get you thinking about where you can make tradeoffs with your own budget!
Where did I save the most money with my wedding?
1. Guests- I was really heavyhanded in controlling the guest list. Most people didn't get +1s, and only the closest family and friends were there. Think about it this way- would these people invite you to their wedding? Do they invite you to their birthday parties? Depending on how much your per person cost is, the difference between 10 additional guests can be like $1000!
2. Flexibility with date- My biggest surprise; I didn't think date would be our biggest bargaining tool. Wedding venues tend to book 12 months out, so they're able to look ahead and see when the dead times are. Not having a date booked at all is a loss for the venue, so if they can slot you in, they'll be happy to make compromises and throw in extras. We ended up getting a ton of extras, and a winter rate outside of the normal winter dates. We also got a Sunday rate too.
3. Not hiring a coordinator- I have no regrets about not hiring someone to help plan, but I actually think we should have hired someone for the day-of work (even if it's like $1000 at least). The peace of mind that comes with just letting someone else take care of all the dirty work is worth it. I was incredibly lucky that my amazing friends stepped in to help.
4. Venue decor- I deliberately picked a place that was gorgeous all on its own, with required minimal decor. I bought chiffon to decorate the arch/aisle, made my own centerpieces, made artifical flower bouquets, and just bought loose rose petals to scatter. It looked amazing. Did not care about special tablecloth or chair covers and the like. I also asked friends and family to help decorate.
5. Bridesmaids dresses- While I didn't pay for these, we knocked the cost down from $150+ per BM to about $20 per BM by making the dresses ourselves.
6. Invitations- we did electronic self-designed Save the Dates, and then bought raw paper and made all the invitations ourselves.
7. DJ/videographer- we deliberately didn't find the highest quality out there for these vendors. We looked at the price we wanted, and then found the best quality FOR THAT PRICE. You will always find more expensive people who are better, but that doesn't mean you need to hire them! This was our compromise for hiring the BEST photographer.
What was the most expensive? What broke the budget?
1. Dress- ended up being more expensive than I wanted. Like the venue, you just have a certain level of fanciness that you're going for. If you can compromise for something a little less nice, you're good, but otherwise, you're looking at $400 minimum up to thousands for your dress. The average price for the styles I liked were around $1000. There's the option to rent as well.
2. Photographer- We fell in love with Ryan Brenizer right off the bat, and we never looked back. He's worth much more than he charges!
3. Makeup- paid a lot more for makeup than I wanted, since I changed plans last minute. But it turned out really nice! It would be cheaper to have friends help, but it's nice to be pampered and have your girls all in a room doing makeup.
4. Venue- the venue is always the most expensive chunk of the wedding, and we definitely found less "fancy" venues for cheaper out there. Ultimately, Calamigos was not as expensive as it COULD have been, but we decided that this was the perfect intersection of how much we were willing to spend for the amazing quality.
The bottom line is- ALWAYS bargain and ALWAYS ask what people can do to make things cheaper. In general, people didn't change the raw price as much as just add in extras for the same price. Think about what REALLY matters to you the most (usually it's photography), and then force yourself to set a reasonable price for the rest. You'll always be tempted to spend more because there is an endless amount of vendors out there, but stick to your guns!
Wednesday, October 13, 2010
Sunday, October 3, 2010
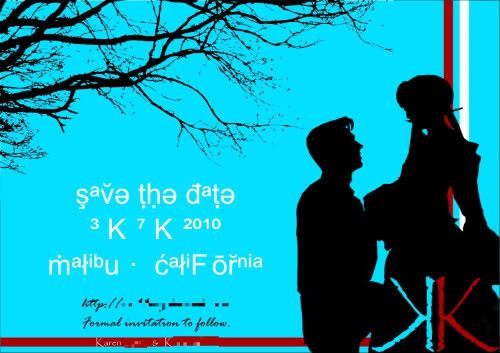
Save the Dates
Work is eating me alive, but I still want to share everything from my wedding! Maybe I'll just post in small chunks!
Here are our save the dates, designed by the groom. We sent it out electronically to save on postage! The silhouettes were created from a photo of us, which the groom edited in Photoshop. (For the more Photoshop-inclined, he just lassoed the outlines of us in the photo and blacked it out.)
Basically, you paste the image directly into the e-mail and hyperlink it to your website. There are tons of really great tutorials already on how to do this, so I'll just link you to this one!
Electronic Save-the-Dates For Dummies, by Mrs. Daffodil on WeddingBee
Sunday, June 6, 2010
Choosing fabric for gowns
After writing my last entry on downtown Los Angeles's Jewelry / Diamond District, I realized that I've seen a lot of questions on fabric floating around the internet for brides-to-be. I've been sewing for over 10 years, so analyzing fabrics as well as cruising around LA's fabric district was easy for me. So I thought I'd write a two part series on (1) fabric for people ambitious enough to make/commission their own bridal or bridesmaids gowns and (2) LA's fabric district! For my wedding, I used fabrics to decorate the archway & aisle, and for the bridesmaid gowns.
So, here goes:
Part 1: Sewing / commissioning clothes for your wedding
You will be in for extreme sticker shock when shopping for your bridal and bridesmaids gowns. $400 is "cheap" for a bride, and from there it soars up easily into the thousands. And for bridesmaids, chances are you're looking at about $130 or so, even for dresses that are pretty simple.
Ways to save money on this are:
(1) Buying matching dresses from a normal retail store- however you'll be extremely limited on colors. So if you're looking to match your color scheme, good luck! We went with aqua for the dresses, and were not able to find anything suitable. You can also go with a color "hue" and have your girls buy their own dresses, but make sure you look up pictures of this happening at other weddings to see if it's something you like or not. (It wasn't for me.)
(2) Commissioning a PROFESSIONAL. This does not include a best friend, parent, grandparent, relative, or anyone else you personally know. Only professionals will be able to deliver on-time and without a lot of micro-management on your part. Make sure you find someone reliable whom you know can deliver and will do multiple fittings on your bridesmaids.
(3) MAKE your own gowns. This will drive your cost down considerably; for example, we were looking at gowns that were about $130 BEFORE alterations. After deciding to make the dresses ourselves, the price ended up being about $20-30 each for fabric, patterns, and notions (zippers, thread, etc).
If you're going with the third route, you need to be hyper aware of the fact that it's going to be stressful. Even with 3 out of 5 of my bridesmaids being experienced seamstresses, there was still last minute sewing up until the morning of the wedding. It just takes time, and with everything else that needs to get done for the wedding, it's a lot of additional work. Prior to this, I would recommend having your bridesmaids try on a bunch of pre-made gowns in order to see what styles work on them best.
That being said, it's time to choose fabrics! Here's a quick rundown of a few "bridal" fabrics:
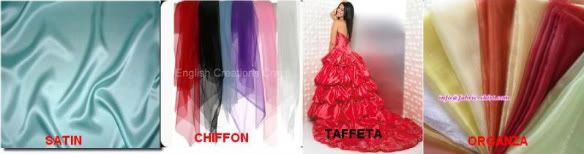
1) Chiffon: Sheer, soft layer that drapes nicely. There are different qualities to chiffon, with some being better woven or softer than others. Make sure you drape the chiffon over the lining fabric and see it in natural light, indoor light, and in photographs before picking your fabric.
- Good: Pretty, fits well in a wedding setting
- Bad: Frays easily, needs to be sewn with particular attention to seams since it's see-through. Seams can also cause the fabric to tear if not sewn properly. Requires a lining layer.
2) Satin: Pretty, all-purpose fabric. Ranges from extremely shiny to totally matte and everything inbetween. There are a LOT of different types of satin, so make sure your fabric texture and weight matches the style of the dress (e.g. don't choose a heavy fabric for light, poofy, airy dresses)
- Good: Bridal satin (super thick, high quality satin)
- Bad: Crepe-back satin (this is satin backed with crepe, which makes it very slippery and more challenging to sew. It's also worse at holding a shape), baroque satin (so shiny that it looks cheap, also needs a lot of ironing).
3) Taffeta: Plasticy, thick fabric used in a lot of gowns. Not as soft to the touch, but popular and pretty solid.
4) Organza: I don't have a lot of experience with organza, but to me it's like the rich man's version of chiffon. Light, airy, see-through, it drapes beautifully and is soft to the touch.
A lot of your decision should hinge on:
(1) Sewing expertise - don't pick something slippery, thin, see-through, tight-fitting, or challenging if you aren't experienced! The flaws will show, and you want everyone to look great on your wedding day.
(2) Body type - Pick something with a flattering fit for your bridesmaids. Where the hems fall and how they emphasize each girl's body is very important!
(3) Weather - is it going to be hot or cold out? Pick a style that won't leave your bridesmaids freezing or sweating!
For short gowns without a lot of gathering, you can get away with 3-4 yards easily per layer, but in general just follow the fabric recommendations on the back of your pattern. DO NOT FORGET to check the fabric width - generally everything is either 45" or 60". This makes a HUGE difference! And while you're at it, buy lots of extra no longer at the store!
Lastly, as for patterns, Simplicity, McCalls, Vogue, and Butterick are all readily available at fabric stores and have a good variety of styles to choose from. If you live near a JoAnn's, make sure to hit up the store when they're having their 99 cent pattern sales (nearly every month). Otherwise they'll run you $10-15 EACH!
--
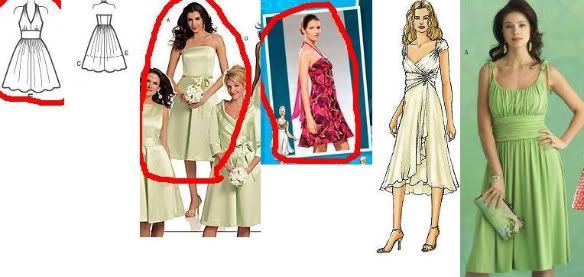
What did we end up doing for my wedding? We chose the following dresses, with an aqua satin underneath a aqua chiffon overlay, and red chiffon wraps/accents:
And this is what they ended up looking like!
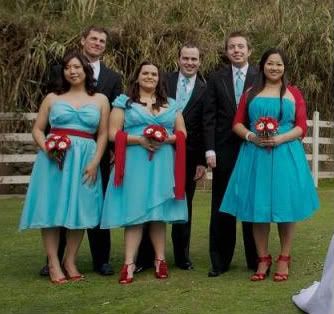
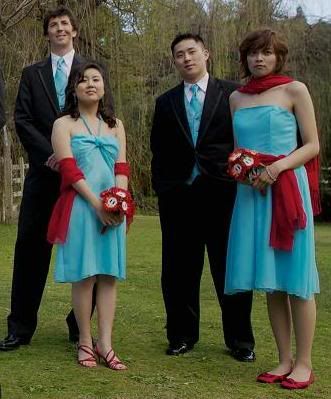
My maid of honor's dress (third from the left) is the only one purchased out of the group. Like I said, you'll fall victim to the trap of not getting things done on time. Luckily she was the MOH and so could have something slightly different!
Next up, a guide to downtown LA's fabric district!
So, here goes:
Part 1: Sewing / commissioning clothes for your wedding
You will be in for extreme sticker shock when shopping for your bridal and bridesmaids gowns. $400 is "cheap" for a bride, and from there it soars up easily into the thousands. And for bridesmaids, chances are you're looking at about $130 or so, even for dresses that are pretty simple.
Ways to save money on this are:
(1) Buying matching dresses from a normal retail store- however you'll be extremely limited on colors. So if you're looking to match your color scheme, good luck! We went with aqua for the dresses, and were not able to find anything suitable. You can also go with a color "hue" and have your girls buy their own dresses, but make sure you look up pictures of this happening at other weddings to see if it's something you like or not. (It wasn't for me.)
(2) Commissioning a PROFESSIONAL. This does not include a best friend, parent, grandparent, relative, or anyone else you personally know. Only professionals will be able to deliver on-time and without a lot of micro-management on your part. Make sure you find someone reliable whom you know can deliver and will do multiple fittings on your bridesmaids.
(3) MAKE your own gowns. This will drive your cost down considerably; for example, we were looking at gowns that were about $130 BEFORE alterations. After deciding to make the dresses ourselves, the price ended up being about $20-30 each for fabric, patterns, and notions (zippers, thread, etc).
If you're going with the third route, you need to be hyper aware of the fact that it's going to be stressful. Even with 3 out of 5 of my bridesmaids being experienced seamstresses, there was still last minute sewing up until the morning of the wedding. It just takes time, and with everything else that needs to get done for the wedding, it's a lot of additional work. Prior to this, I would recommend having your bridesmaids try on a bunch of pre-made gowns in order to see what styles work on them best.
That being said, it's time to choose fabrics! Here's a quick rundown of a few "bridal" fabrics:
1) Chiffon: Sheer, soft layer that drapes nicely. There are different qualities to chiffon, with some being better woven or softer than others. Make sure you drape the chiffon over the lining fabric and see it in natural light, indoor light, and in photographs before picking your fabric.
- Good: Pretty, fits well in a wedding setting
- Bad: Frays easily, needs to be sewn with particular attention to seams since it's see-through. Seams can also cause the fabric to tear if not sewn properly. Requires a lining layer.
2) Satin: Pretty, all-purpose fabric. Ranges from extremely shiny to totally matte and everything inbetween. There are a LOT of different types of satin, so make sure your fabric texture and weight matches the style of the dress (e.g. don't choose a heavy fabric for light, poofy, airy dresses)
- Good: Bridal satin (super thick, high quality satin)
- Bad: Crepe-back satin (this is satin backed with crepe, which makes it very slippery and more challenging to sew. It's also worse at holding a shape), baroque satin (so shiny that it looks cheap, also needs a lot of ironing).
3) Taffeta: Plasticy, thick fabric used in a lot of gowns. Not as soft to the touch, but popular and pretty solid.
4) Organza: I don't have a lot of experience with organza, but to me it's like the rich man's version of chiffon. Light, airy, see-through, it drapes beautifully and is soft to the touch.
A lot of your decision should hinge on:
(1) Sewing expertise - don't pick something slippery, thin, see-through, tight-fitting, or challenging if you aren't experienced! The flaws will show, and you want everyone to look great on your wedding day.
(2) Body type - Pick something with a flattering fit for your bridesmaids. Where the hems fall and how they emphasize each girl's body is very important!
(3) Weather - is it going to be hot or cold out? Pick a style that won't leave your bridesmaids freezing or sweating!
For short gowns without a lot of gathering, you can get away with 3-4 yards easily per layer, but in general just follow the fabric recommendations on the back of your pattern. DO NOT FORGET to check the fabric width - generally everything is either 45" or 60". This makes a HUGE difference! And while you're at it, buy lots of extra no longer at the store!
Lastly, as for patterns, Simplicity, McCalls, Vogue, and Butterick are all readily available at fabric stores and have a good variety of styles to choose from. If you live near a JoAnn's, make sure to hit up the store when they're having their 99 cent pattern sales (nearly every month). Otherwise they'll run you $10-15 EACH!
--
What did we end up doing for my wedding? We chose the following dresses, with an aqua satin underneath a aqua chiffon overlay, and red chiffon wraps/accents:
And this is what they ended up looking like!
My maid of honor's dress (third from the left) is the only one purchased out of the group. Like I said, you'll fall victim to the trap of not getting things done on time. Luckily she was the MOH and so could have something slightly different!
Next up, a guide to downtown LA's fabric district!
Sunday, May 9, 2010
Wedding ring shopping in downtown Los Angeles
Wedding ring shopping in downtown Los Angeles
To anyone who may be reading this and does not live in driving distance of Los Angeles, I apologize for the envy that this post may cause!
Downtown Los Angeles is crisscrossed with one-way streets, smog, hobos, and best of all, tons and tons of specialized shopping districts that sell everything you'd need for a wedding at wholesale cost. This includes the fabric district, flower district, jewelry district, wholesale crafts, seamstresses, and other stores that sell feather, beads, toys, veils, petticoats, lingerie, clothes, sunglasses.. you name it!!
The jewelry district is a FANTASTIC place to shop, as it is littered with 15+ story buildings packed with jewelry shops on every floor. The prices are unbeatable, and you can buy anything from rings you see at Robbins Bros, to loose diamonds, to custom created pieces. You can even have your existing rings redesigned!
First and most importantly, RESEARCH before you go. There are HUNDREDS of jewelry shops, and after awhile they all look the same. And how do you really know that what you're looking at is real gold, or even real diamonds? The best way to get around this is to go with a trusted vendor. Google and Yelp are your best friends! It's also great to visit a Robbins Bros or other chain to get an idea of what you like first. It'll also give you a better appreciation of how much money you're saving!
Here are the places I visited (parking at Pershing Square):
(1) Bridal Rings Company - My favorite of the bunch. Really professional store with great prices and selection. It's Robbins Bros-ish in that a sales person generally gets assigned to help you, but they don't pressure you at all. They're more than happy to give you any information you need and have you come back later. They can also customize something to order. At this moment, there's a Yelp discount for 5% or $50 off. Yelp link
(2) Icing on the Ring - A wide variety of rings on display - traditional bands, rings with various stones, white/yellow gold fused bands, non-traditional bands with interconnected leaves/flowers, etc. They gave some really great practical advice - I was really interested in the bands with leaves and flowers, but they were very honest in telling me that rings like that don't last as long as traditional bands, especially if I was rough on my rings (and I am!). Yelp link
(3) Eli's Jewelry - Fantastic family run store. They had a good selection, but the true differentiator of Eli's was the beautiful custom design work that the sons of the family do. While we were shopping there, one of the sons showed us his handiwork on a engagement ring and wedding band set. It was meticulously designed and beautifully crafted, with each angle of the band taken into consideration. We were really impressed and will definitely come to Debebians for a custom piece (or to add on to my engagement ring for a future anniversary) in the future!Yelp link
(4) Debebians - The people who helped us at Debebians were GREAT - young, friendly, and professional. At the time, they didn't have a store yet, so they were totally happy with us sending in a whole list of rings we wanted to see. When we went in to their office, they had all the rings in a little display tray in the proper sizes, and they were so nice and accommodating. We did try to get a customized ring from them, however, and whether it was the fault of us not drawing out a detailed diagram of what we wanted or their own quality issues, it didn't come out as expected. However, they were totally willing to rework the ring as much as needed, and in the end gave us a full refund with no hassle because it just didn't match up to our specifications. I honestly DO recommend them for their quality and selection, however. They had a lot of rings that we had seen at Robbins Bros for a lot cheaper.
(5) Titanium Kay - GREAT selection. They had a ton of men's rings that we had not seen anywhere else, and we looked all over! The salesperson who helped us was not great at English, but they were really organized in that we brought in a list of rings we liked from their website and they pulled each one for us to examine. Yelp link
Tips:
1. Plan your trip by researching trusted vendors, and make a list of places & addresses to go. I wouldn't recommend just dropping in without at least a starting point. Once you're there, feel free to wander in to stores that catch your eye, but remember that you're doing so without a good idea of if they're legit!
2. Ask how you can make a particular piece of jewelry cheaper. Everyone I spoke to was more than willing to quote prices based on changing out the metal, or removing the engraving, or a variety of other options.
3. Check if they have a service plan for cleaning or resizing!
4. Offer to pay in CASH. A lot of vendors will comp the tax.
5. If you plan to customize a ring, get detailed information on how the vendor goes about making the actual ring. For instance, will they show you a drawing? Will they make a 3D model on a computer, and then a wax/plastic version for review before casting the actual ring?
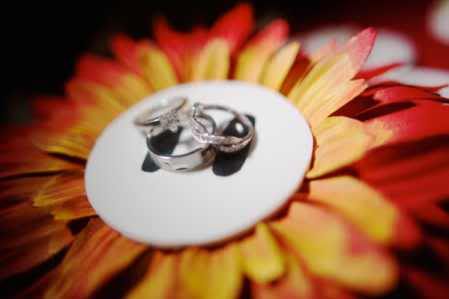
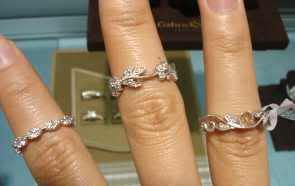
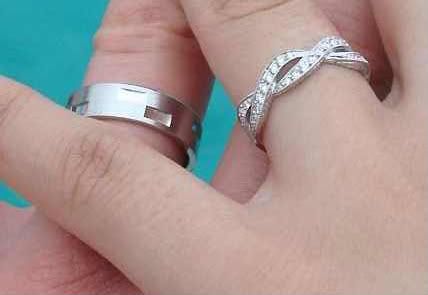
6. Take a photo of the rings on your fingers. Even better if you can put a few different rings on your fingers and have them all in one photo! Like so! Isn't it a nice and easy comparison?
7. Bring a notebook and write down EVERYTHING - price, style #, designer, diamond size, etc. You'll see so many that you'll just forget.
As for me, I did the rounds at Robbins Bros and a few other stores before going downtown. The rings we ended up are:
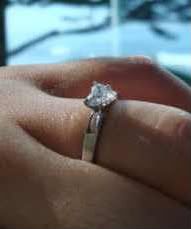
Engagement ring (purchased online at Blue Nile): Heart-cut diamond on a white gold band
Bride's ring (first seen at Bridal Rings Company but bought elsewhere): Infinity band with pave set diamonds, white gold
Groom's ring (purchased at Robbins Bros): White gold with rectangular cutouts, designed by Frederick Goldman
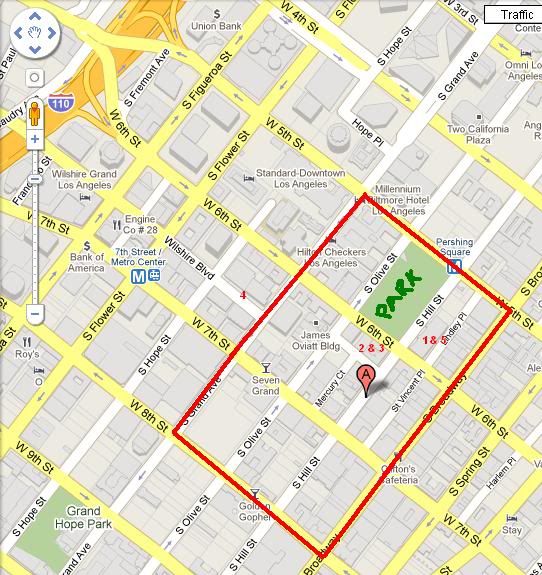
Lastly, here's a very approximate map, including where I parked and the 5 stores named above. HAPPY HUNTING!
To anyone who may be reading this and does not live in driving distance of Los Angeles, I apologize for the envy that this post may cause!
Downtown Los Angeles is crisscrossed with one-way streets, smog, hobos, and best of all, tons and tons of specialized shopping districts that sell everything you'd need for a wedding at wholesale cost. This includes the fabric district, flower district, jewelry district, wholesale crafts, seamstresses, and other stores that sell feather, beads, toys, veils, petticoats, lingerie, clothes, sunglasses.. you name it!!
The jewelry district is a FANTASTIC place to shop, as it is littered with 15+ story buildings packed with jewelry shops on every floor. The prices are unbeatable, and you can buy anything from rings you see at Robbins Bros, to loose diamonds, to custom created pieces. You can even have your existing rings redesigned!
First and most importantly, RESEARCH before you go. There are HUNDREDS of jewelry shops, and after awhile they all look the same. And how do you really know that what you're looking at is real gold, or even real diamonds? The best way to get around this is to go with a trusted vendor. Google and Yelp are your best friends! It's also great to visit a Robbins Bros or other chain to get an idea of what you like first. It'll also give you a better appreciation of how much money you're saving!
Here are the places I visited (parking at Pershing Square):
(1) Bridal Rings Company - My favorite of the bunch. Really professional store with great prices and selection. It's Robbins Bros-ish in that a sales person generally gets assigned to help you, but they don't pressure you at all. They're more than happy to give you any information you need and have you come back later. They can also customize something to order. At this moment, there's a Yelp discount for 5% or $50 off. Yelp link
(2) Icing on the Ring - A wide variety of rings on display - traditional bands, rings with various stones, white/yellow gold fused bands, non-traditional bands with interconnected leaves/flowers, etc. They gave some really great practical advice - I was really interested in the bands with leaves and flowers, but they were very honest in telling me that rings like that don't last as long as traditional bands, especially if I was rough on my rings (and I am!). Yelp link
(3) Eli's Jewelry - Fantastic family run store. They had a good selection, but the true differentiator of Eli's was the beautiful custom design work that the sons of the family do. While we were shopping there, one of the sons showed us his handiwork on a engagement ring and wedding band set. It was meticulously designed and beautifully crafted, with each angle of the band taken into consideration. We were really impressed and will definitely come to Debebians for a custom piece (or to add on to my engagement ring for a future anniversary) in the future!Yelp link
(4) Debebians - The people who helped us at Debebians were GREAT - young, friendly, and professional. At the time, they didn't have a store yet, so they were totally happy with us sending in a whole list of rings we wanted to see. When we went in to their office, they had all the rings in a little display tray in the proper sizes, and they were so nice and accommodating. We did try to get a customized ring from them, however, and whether it was the fault of us not drawing out a detailed diagram of what we wanted or their own quality issues, it didn't come out as expected. However, they were totally willing to rework the ring as much as needed, and in the end gave us a full refund with no hassle because it just didn't match up to our specifications. I honestly DO recommend them for their quality and selection, however. They had a lot of rings that we had seen at Robbins Bros for a lot cheaper.
(5) Titanium Kay - GREAT selection. They had a ton of men's rings that we had not seen anywhere else, and we looked all over! The salesperson who helped us was not great at English, but they were really organized in that we brought in a list of rings we liked from their website and they pulled each one for us to examine. Yelp link
Tips:
1. Plan your trip by researching trusted vendors, and make a list of places & addresses to go. I wouldn't recommend just dropping in without at least a starting point. Once you're there, feel free to wander in to stores that catch your eye, but remember that you're doing so without a good idea of if they're legit!
2. Ask how you can make a particular piece of jewelry cheaper. Everyone I spoke to was more than willing to quote prices based on changing out the metal, or removing the engraving, or a variety of other options.
3. Check if they have a service plan for cleaning or resizing!
4. Offer to pay in CASH. A lot of vendors will comp the tax.
5. If you plan to customize a ring, get detailed information on how the vendor goes about making the actual ring. For instance, will they show you a drawing? Will they make a 3D model on a computer, and then a wax/plastic version for review before casting the actual ring?
6. Take a photo of the rings on your fingers. Even better if you can put a few different rings on your fingers and have them all in one photo! Like so! Isn't it a nice and easy comparison?
7. Bring a notebook and write down EVERYTHING - price, style #, designer, diamond size, etc. You'll see so many that you'll just forget.
As for me, I did the rounds at Robbins Bros and a few other stores before going downtown. The rings we ended up are:
Engagement ring (purchased online at Blue Nile): Heart-cut diamond on a white gold band
Bride's ring (first seen at Bridal Rings Company but bought elsewhere): Infinity band with pave set diamonds, white gold
Groom's ring (purchased at Robbins Bros): White gold with rectangular cutouts, designed by Frederick Goldman
Lastly, here's a very approximate map, including where I parked and the 5 stores named above. HAPPY HUNTING!
Thursday, April 8, 2010
Southern California wedding venues
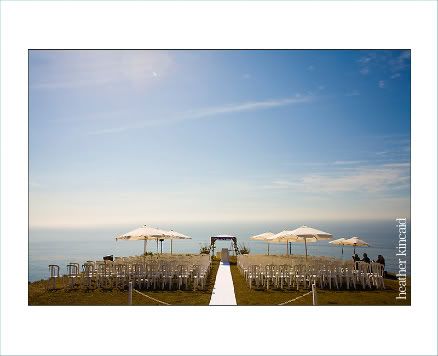
I am crazy about reading people's reviews and experiences with things I'm considering spending money on, and there was certainly no exception with wedding planning! I used my mad Google-fu to conjure up vendor reviews and impressions from all over the internet when making my decisions. So I decided to let myself continue to be long-winded and overly detailed and share my wedding venue impressions with you! This will really only be relevant to southern California (Los Angeles in particular) brides who are interested in oceanfront venues. But I hope someone can stumble across this and learn something! These are just *my* personal impressions of the venues and their relation to what I was looking for, but by no means were any of these bad places. You might just find something you like in one of these!
Venue reviews:
When we started looking at venues, our number one leading requirement was an oceanfront venue. And I don't mean on the beach or just an "ocean view", but right on the water. So our search proceeded keeping this in mind, looking up and down the southern California coast until we finally settled on our venue... which ended up not having even an ocean view at all!
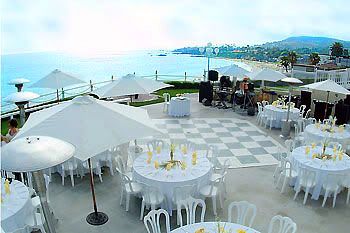
1) Occasions at Laguna Village (Laguna Beach)- It's the most gorgeous ocean venue you could really find, with the ceremony and reception on a patio literally on top of the ocean. Surprisingly, it was not immediately out of reach as far as pricing goes, but it was still more than we were willing to go over our budget. Their package was all-inclusive all the way down to the cake and favors, so that is super convenient for someone who doesn't want to shop around. However, I knew my wedding was going to be crazily customized, so even though they try to allow as much customization as possible, it wouldn't have worked for me. Had I been willing to go over-budget and give up a lot of customization, I would have gone with Occasions for sure. Click here for my more detailed review of Occasions, with more photos!
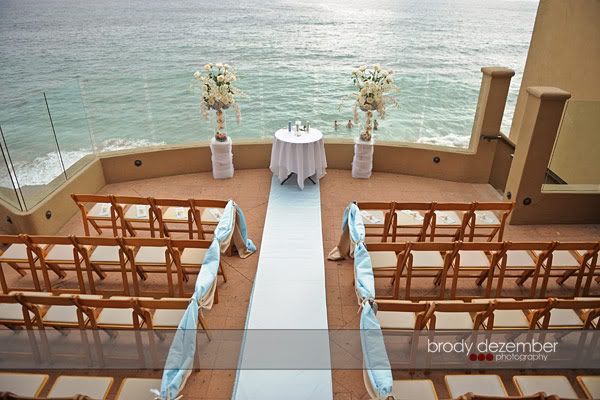
2) Surf and Sand Resort (Laguna Beach)- It was a nice venue, with great lounging areas and overall an upscale hotel in general. However, I found it to be way overpriced and not what I wanted at all. The wedding site was really just a patio overlooking the ocean in front of three or so hotel rooms, which they require you rent for the wedding for a few hundred dollars apiece. The reception venue was also just a generic hotel ballroom, and I didn't want to pay money to only get married by the ocean and not be able to see it throughout my reception.
3) Best Western Shore Cliff Lodge (Pismo Beach)- This venue had both the reception and ceremony sites right on the cliffs and had reasonable prices for everything. We ended up deciding that we wanted to do something local, as most of our guests are in southern California.
4) The Cliffs Resort (Pismo Beach)- Really nice, fancy venue, which also ended up being overbudget. It was a really nice hotel with great spots for the ceremony and reception on grassy fields in front of the ocean and a classy cocktail hour space. But again, for the same reason above, we decided not to have our wedding in Pismo Beach.
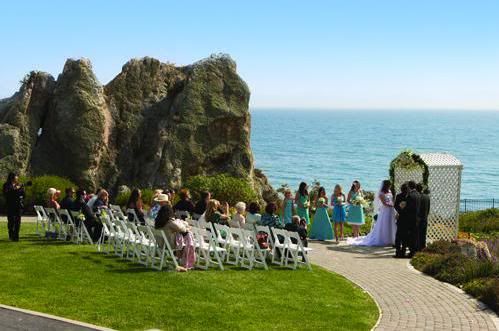
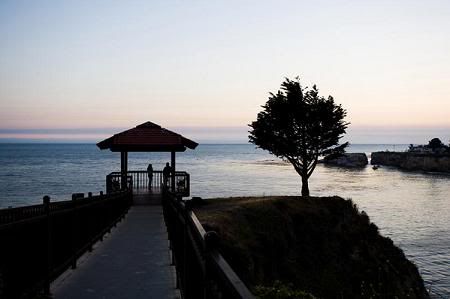
5) The Best Western Shelter Cove Lodge (Pismo Beach)- I actually hadn't even planned on visiting this venue since they only had enough space for like, 70 people for ceremony only. But we ended up driving past it and popped in. They have two ceremony sites, one of which was the most killer 25 person ceremony site ever. It was basically just this little gazebo on the cliffs that you have to walk to on a really narrow walkway thing. It was totally epic, but obviously not what we were looking for.
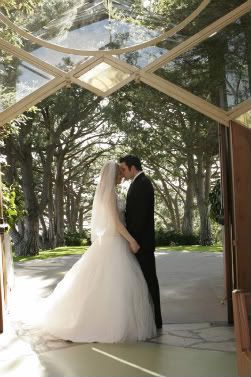
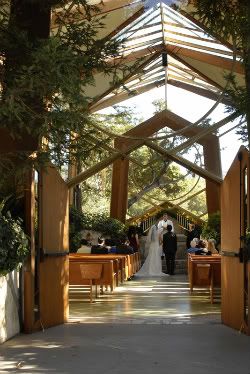
6) Wayfarers Chapel (Palos Verdes)- SO gorgeous. I've lived in Palos Verdes my entire life and yet I'd never been to Wayfarer's Chapel! It was amazing.. the trees, ocean breeze, and the unique wooden architecture gave this place such a tranquil feeling. But the real deal-killer was the fact that it only allowed 100 people and that they book you in very tight timeslots, usually with other wedding parties coming in before and after you. While I'm sure the ceremony is boring to some people and that some guests may opt out of the ceremony, I feel like I still want to give everyone invited the opportunity to see it. I attended a cousin's reception where the actual wedding had already taken place earlier that day (they did the traditional Chinese 'groom visits the bride's house' dealie), and while it was wonderful to celebrate with them at the reception, I feel like I really missed out on the actual "wedding".
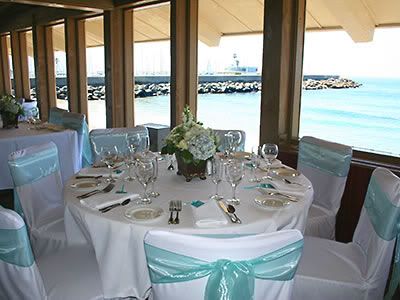
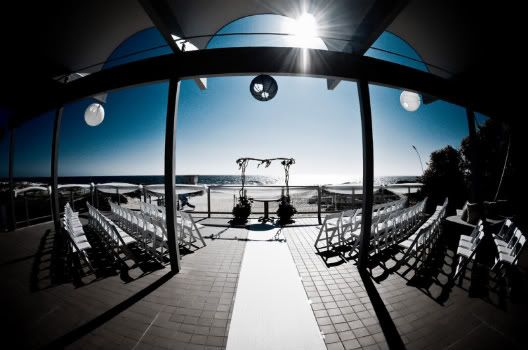
7) Chart House (Redondo Beach)- Really, really nice place for a good price. It's a restaurant right on the beach and there's even an option to do the ceremony right outside on the sand. The cost was pretty much just the cost of the entrees; there was only a very minimal fee that covered linens and non-alcoholic drinks and cake and staff. (What a nice change from all these other wedding venues that way overcharge for food!) It would have been a very nice reception except for a few things. There was a very strong smell of tar when we were there (and we also got tar on our shoes walking around outside). The venue also had a restaurant layout, with the tables separated in sections around the entire floor. The dance floor was off to the side, so there wasn't a central place to do things where the guests could watch from their table. The Yelp reviews for the food at this place weren't so hot either.
8) Malibu West Beach Club (Malibu)- The best cost savings venue that we looked at, but ultimately it was not a very inspiring venue for me. It's basically just a main room and a large patio area, and they include all tables and chairs. There's quite a stretch of beach in front of the beach club where the public can mill around and get in your wedding photos, and also this huge bright blue/yellow colored playground in plain view on the beach. They allow you to BYO food/alcohol, which is an enormous cost savings. You do, however, have to rent parking space at a nearby parking lot for guests.

9) Malibu Nature Preserve (Malibu)- Really, really cool nature-y spot. There were ~3-4 different areas where you could have your ceremony/reception, including this AMAZING cliff area that they shuttle all your guests up to for a 360 panoramic view of Malibu. They also had areas where you could marry in a grassy field or in front of beautiful trees. It felt really secluded, and the staff was really nice. You do have to rent tables/chairs/etc from an outside party.
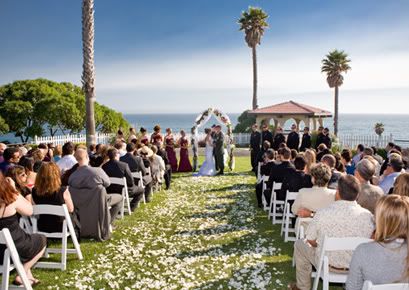
10) Calamigos Ranch (Malibu)- The place we ended up going with, despite the complete lack of ocean view! calamigos Ranch is this 160-acre "ranch" that's basically a big event space. There's about 4 or so different areas you could have an event in, each completely isolated from each other so that they could even host events simultaneously with no overlap! They had lights strung up in the trees through the entire complex, and so much of the venue was pre-decorated to the point where you'd only need minimal decorations of your own. The price was great, the staff was great, and the venue was so tranquil and picturesque that I couldn't stop thinking about it after we saw it.
11) Rancho Del Cielo (Malibu)- LOVELY venue high up in Malibu with a breathtaking 360 degree view. Very charming, isolated venue where you basically get the house & grounds of the house for your exclusive use for a day. I really envy the lady who gets to live there! The people here were the nicest wedding venue people we came across; they would have been wonderfully pleasant to coordinate with, as they were just so excited about weddings and the unique things they had seen couples married at their venue do. However, all the venue really has is the site; you have to pay for parking lot rentals, shuttle buses, tables/chairs/etc, catering, and everything else in addition to the pricey venue cost. It ended up being way too expensive for us.
Also two places I didn't end up visiting (as it would have been around the same price as Calamigos and we were pretty much in love with it already) - Ambassador Mansion & Gardens in Pasadena, and Villa del Sol d'Oro (Alverno Villa) in Sierra Madre.
Venue reviews:
When we started looking at venues, our number one leading requirement was an oceanfront venue. And I don't mean on the beach or just an "ocean view", but right on the water. So our search proceeded keeping this in mind, looking up and down the southern California coast until we finally settled on our venue... which ended up not having even an ocean view at all!
1) Occasions at Laguna Village (Laguna Beach)- It's the most gorgeous ocean venue you could really find, with the ceremony and reception on a patio literally on top of the ocean. Surprisingly, it was not immediately out of reach as far as pricing goes, but it was still more than we were willing to go over our budget. Their package was all-inclusive all the way down to the cake and favors, so that is super convenient for someone who doesn't want to shop around. However, I knew my wedding was going to be crazily customized, so even though they try to allow as much customization as possible, it wouldn't have worked for me. Had I been willing to go over-budget and give up a lot of customization, I would have gone with Occasions for sure. Click here for my more detailed review of Occasions, with more photos!
2) Surf and Sand Resort (Laguna Beach)- It was a nice venue, with great lounging areas and overall an upscale hotel in general. However, I found it to be way overpriced and not what I wanted at all. The wedding site was really just a patio overlooking the ocean in front of three or so hotel rooms, which they require you rent for the wedding for a few hundred dollars apiece. The reception venue was also just a generic hotel ballroom, and I didn't want to pay money to only get married by the ocean and not be able to see it throughout my reception.
3) Best Western Shore Cliff Lodge (Pismo Beach)- This venue had both the reception and ceremony sites right on the cliffs and had reasonable prices for everything. We ended up deciding that we wanted to do something local, as most of our guests are in southern California.
4) The Cliffs Resort (Pismo Beach)- Really nice, fancy venue, which also ended up being overbudget. It was a really nice hotel with great spots for the ceremony and reception on grassy fields in front of the ocean and a classy cocktail hour space. But again, for the same reason above, we decided not to have our wedding in Pismo Beach.
5) The Best Western Shelter Cove Lodge (Pismo Beach)- I actually hadn't even planned on visiting this venue since they only had enough space for like, 70 people for ceremony only. But we ended up driving past it and popped in. They have two ceremony sites, one of which was the most killer 25 person ceremony site ever. It was basically just this little gazebo on the cliffs that you have to walk to on a really narrow walkway thing. It was totally epic, but obviously not what we were looking for.
6) Wayfarers Chapel (Palos Verdes)- SO gorgeous. I've lived in Palos Verdes my entire life and yet I'd never been to Wayfarer's Chapel! It was amazing.. the trees, ocean breeze, and the unique wooden architecture gave this place such a tranquil feeling. But the real deal-killer was the fact that it only allowed 100 people and that they book you in very tight timeslots, usually with other wedding parties coming in before and after you. While I'm sure the ceremony is boring to some people and that some guests may opt out of the ceremony, I feel like I still want to give everyone invited the opportunity to see it. I attended a cousin's reception where the actual wedding had already taken place earlier that day (they did the traditional Chinese 'groom visits the bride's house' dealie), and while it was wonderful to celebrate with them at the reception, I feel like I really missed out on the actual "wedding".
7) Chart House (Redondo Beach)- Really, really nice place for a good price. It's a restaurant right on the beach and there's even an option to do the ceremony right outside on the sand. The cost was pretty much just the cost of the entrees; there was only a very minimal fee that covered linens and non-alcoholic drinks and cake and staff. (What a nice change from all these other wedding venues that way overcharge for food!) It would have been a very nice reception except for a few things. There was a very strong smell of tar when we were there (and we also got tar on our shoes walking around outside). The venue also had a restaurant layout, with the tables separated in sections around the entire floor. The dance floor was off to the side, so there wasn't a central place to do things where the guests could watch from their table. The Yelp reviews for the food at this place weren't so hot either.
8) Malibu West Beach Club (Malibu)- The best cost savings venue that we looked at, but ultimately it was not a very inspiring venue for me. It's basically just a main room and a large patio area, and they include all tables and chairs. There's quite a stretch of beach in front of the beach club where the public can mill around and get in your wedding photos, and also this huge bright blue/yellow colored playground in plain view on the beach. They allow you to BYO food/alcohol, which is an enormous cost savings. You do, however, have to rent parking space at a nearby parking lot for guests.
9) Malibu Nature Preserve (Malibu)- Really, really cool nature-y spot. There were ~3-4 different areas where you could have your ceremony/reception, including this AMAZING cliff area that they shuttle all your guests up to for a 360 panoramic view of Malibu. They also had areas where you could marry in a grassy field or in front of beautiful trees. It felt really secluded, and the staff was really nice. You do have to rent tables/chairs/etc from an outside party.
10) Calamigos Ranch (Malibu)- The place we ended up going with, despite the complete lack of ocean view! calamigos Ranch is this 160-acre "ranch" that's basically a big event space. There's about 4 or so different areas you could have an event in, each completely isolated from each other so that they could even host events simultaneously with no overlap! They had lights strung up in the trees through the entire complex, and so much of the venue was pre-decorated to the point where you'd only need minimal decorations of your own. The price was great, the staff was great, and the venue was so tranquil and picturesque that I couldn't stop thinking about it after we saw it.
11) Rancho Del Cielo (Malibu)- LOVELY venue high up in Malibu with a breathtaking 360 degree view. Very charming, isolated venue where you basically get the house & grounds of the house for your exclusive use for a day. I really envy the lady who gets to live there! The people here were the nicest wedding venue people we came across; they would have been wonderfully pleasant to coordinate with, as they were just so excited about weddings and the unique things they had seen couples married at their venue do. However, all the venue really has is the site; you have to pay for parking lot rentals, shuttle buses, tables/chairs/etc, catering, and everything else in addition to the pricey venue cost. It ended up being way too expensive for us.
Also two places I didn't end up visiting (as it would have been around the same price as Calamigos and we were pretty much in love with it already) - Ambassador Mansion & Gardens in Pasadena, and Villa del Sol d'Oro (Alverno Villa) in Sierra Madre.
Thursday, March 25, 2010
Invitation Inserts!
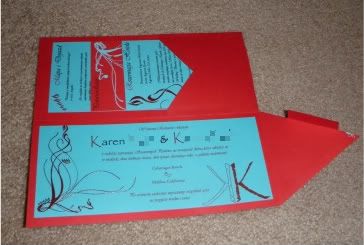
How I Made My Invitations - Inserts
I described how I made my pocketfolds in my previous post, so let's move on to the actual inserts themselves!
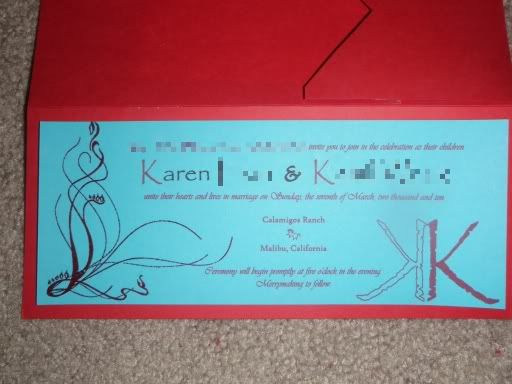
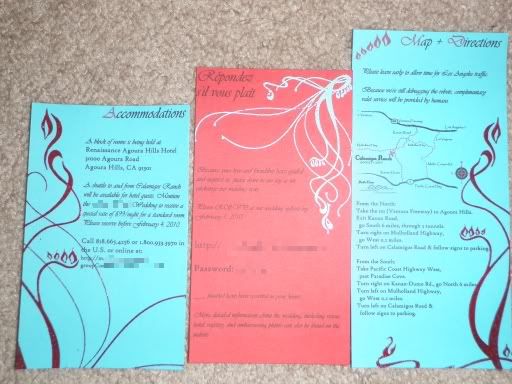
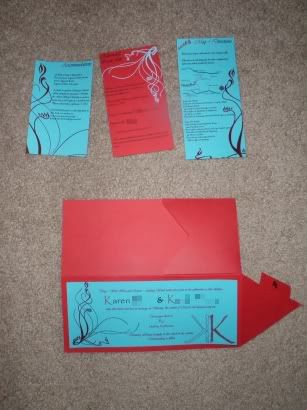
We only had a main invitation, map & directions card, accommodations card, and a RSVP card (which directed people to RSVP online via our website, so we didn't have to include a reply envelope)! My fiance designed the text layout, I printed them using a bridesmaid's color printer, and I cut all the inserts based off the dimensions of my pocketfold. The fire & water designs that you see in the left and right corners are the embossed designs.
I researched a lot of different invitation and insert card wordings before we came up with ours, so I wanted to share what we put:
The main insert text reads:
[Bride's Mom & Dad] and [Groom's Mom & Dad] invite you to join in the celebration as their children
[Bride] & [Groom]
unite their hearts and lives in marriage on Sunday, the seventh of March, two thousand and ten.
Calamigos Ranch
Malibu, California
Ceremony will begin promptly at five o'clock in the evening.
Merrymaking to follow.
Accommodations insert text reads:
A block of rooms is being held at:
[Hotel address]
A shuttle to and from Calamigos Ranch will be available for hotel guests. Mention the [Bride/Groom Last Names] Wedding to receive a special rate of $99/night for a standard room. Please reserve before February 4, 2010.
[Hotel contact info]
RSVP text reads:
Because your love and friendship have guided and inspired us, please share in our joy as we exchange our wedding vows.
Please RSVP at our wedding website by February 1, 2010:
[Website URL & password]
___ place(s) have been reserved in your honor (we hand-wrote these numbers in)
More detailed information about the wedding, including venue, hotel, registry, and embarassing photos can also be found on the website.
Map & Directions text reads:
Please leave early to allow time for Los Angeles traffic.
Because we're still debugging the robots, complimentary valet service will be provided by humans. (My husband's field of work is with automated robotics such as this, so we put this in as a joke as well as to let people know that valet parking was free!)
[Map & written directions]
Again, the red insert card was the Mohawk Via Vellum 80# coverweight paper in scarlet (same as the red pocketfold) and the blue insert cards were the Astrobright 65# coverweight paper in lunar blue. If you're going for bright, unique colors to match your wedding scheme, you'll most likely end up with the Astrobright line of papers.
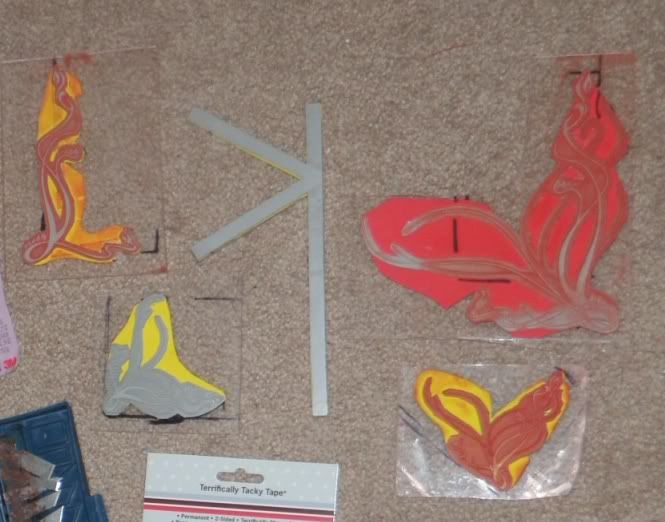
First off, one of the design elements in my wedding was fire & water, so we asked one of my bridesmaids who was also an artist to design the graphics based off of a lot of fire/water references I pulled off istockphoto.com. If you don't have an artist friend to beg for help, I'd highly recommend just pulling something off there! They have a LOT of great and cheap images. Here are a few of the references I sent her, although she looked up plenty of her own as well that were much better:

(These were 10490321, 3596259, 4723348 if you're interested)
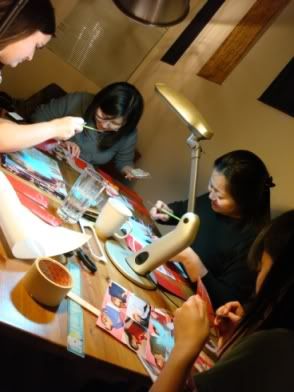
She created the designs as a vector, and my other bridesmaid works at a company that happens to have a laser-cutting printer! So we made stamps with the designs by laser-cutting rubber, and glued it to a sheet of acrylic and foam backing (to help distribute the pressure when pressing down on the stamp). We tried stamping without the foam and it came out MUCH better with a foamie backing. We also didn't cut the design into the rubber deep enough, so we had to be extra careful when stamping the ink to avoid smudging. Super annoying!
(I have a picture of my bridesmaid staring at the laser printer as the stamp was being cut; I'll put it here tomorrow!)
Here are the five stamps that got created (the red & yellow is the foam backing).
Some words of advice on embossing:
1) Remember how I mentioned the pitfalls of using colored paper in the previous tutorial? The same applies for embossing as well as printing - the color of the embossing stamp ink and powder come out differently depending on your paper color (and probably paper type as well). So to get an exact shade, you have to practice with a lot of different colored inks and powders. In conclusion, if you have a choice, go with WHITE paper!
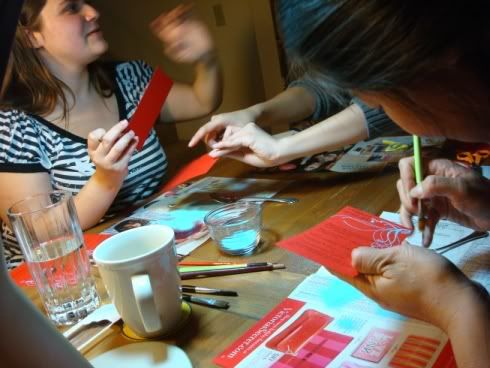
2) With embossing, you basically stamp on some slow-drying ink, cover it with embossing powder, brush off the excess powder, and heat blast the powder until it melts together. Slow-drying ink (PIGMENT ink) is required for this purpose because otherwise the ink will dry too quickly for the powder to catch on. People also recommend the combination of colored ink and transparent powder rather than the other way around (transparent ink and colored powder) because when the powder melts together, it doesn't always do so smoothly, especially if you don't have an ultra-fine powder. So you get left with tiny little bumps and "dents" in your design. Another reason is that you'll get excess powder clinging to the paper, and if the powder is clear, it's not really a problem. Since I used colored powder, I employed my lucky bridesmaids to take paintbrushes to the invitations and brush off the excess powder. Like so!

3) YES, you can achieve a very fine level of detail with embossing - pretty much exactly what you stamp onto the paper will come out in the embossing. I was skeptical of this at first, but trust me.. it's precise!
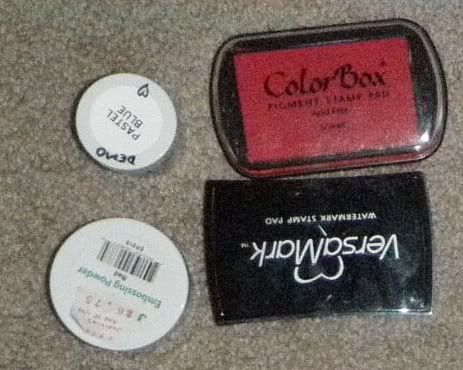
So what I ended up using was: for the blue emboss on the red paper, I used the Versamark watermark ink (transparent), and then Pastel Blue Stamp A Mania embossing powder to achieve the exact blue color. For the red emboss on blue paper, I wasn't so lucky, so the closest I got was using the Colormark pigment stamp in Scarlet with Judi Kins embossing powder in red - this yielded a darker, more blood red color on the blue paper, but I was past caring at this point. (This was, however, a better red than I got with transparent ink and colored powder, and other shades and brands of red pigment ink.)
There have been a ton of great embossing tutorials posted online, so I'll just link to a few that have documented it much better than I could: Heat Embossing on Weddingbee, How To Emboss in Weddingbee, Paper Source's How To videos.
Embossing is very easy, somewhat time consuming (but much less so if you use clear powder), but VERY worth it. They create a lovely raised design that add a lot of extra detail to your invitations, and your guests WILL notice. Walk into your local stamping store or Paper Source and they'll be happy to show you a demo! Beware though; you'll most likely walk out of there with tons of embossing supplies and make a lot more work for yourself.
After all the embossing, I smeared glue-stick on the back of the main invite and manually aligned it onto the pocketfold. The main invitation was cut to a particular dimension that would allow a consistent-width border around the edges.
Fin! (We wanted to emboss just about everything paper-related for the wedding, but after this ordeal I was pretty much over it!)
I described how I made my pocketfolds in my previous post, so let's move on to the actual inserts themselves!
We only had a main invitation, map & directions card, accommodations card, and a RSVP card (which directed people to RSVP online via our website, so we didn't have to include a reply envelope)! My fiance designed the text layout, I printed them using a bridesmaid's color printer, and I cut all the inserts based off the dimensions of my pocketfold. The fire & water designs that you see in the left and right corners are the embossed designs.
I researched a lot of different invitation and insert card wordings before we came up with ours, so I wanted to share what we put:
The main insert text reads:
[Bride's Mom & Dad] and [Groom's Mom & Dad] invite you to join in the celebration as their children
[Bride] & [Groom]
unite their hearts and lives in marriage on Sunday, the seventh of March, two thousand and ten.
Calamigos Ranch
Malibu, California
Ceremony will begin promptly at five o'clock in the evening.
Merrymaking to follow.
Accommodations insert text reads:
A block of rooms is being held at:
[Hotel address]
A shuttle to and from Calamigos Ranch will be available for hotel guests. Mention the [Bride/Groom Last Names] Wedding to receive a special rate of $99/night for a standard room. Please reserve before February 4, 2010.
[Hotel contact info]
RSVP text reads:
Because your love and friendship have guided and inspired us, please share in our joy as we exchange our wedding vows.
Please RSVP at our wedding website by February 1, 2010:
[Website URL & password]
___ place(s) have been reserved in your honor (we hand-wrote these numbers in)
More detailed information about the wedding, including venue, hotel, registry, and embarassing photos can also be found on the website.
Map & Directions text reads:
Please leave early to allow time for Los Angeles traffic.
Because we're still debugging the robots, complimentary valet service will be provided by humans. (My husband's field of work is with automated robotics such as this, so we put this in as a joke as well as to let people know that valet parking was free!)
[Map & written directions]
Again, the red insert card was the Mohawk Via Vellum 80# coverweight paper in scarlet (same as the red pocketfold) and the blue insert cards were the Astrobright 65# coverweight paper in lunar blue. If you're going for bright, unique colors to match your wedding scheme, you'll most likely end up with the Astrobright line of papers.
First off, one of the design elements in my wedding was fire & water, so we asked one of my bridesmaids who was also an artist to design the graphics based off of a lot of fire/water references I pulled off istockphoto.com. If you don't have an artist friend to beg for help, I'd highly recommend just pulling something off there! They have a LOT of great and cheap images. Here are a few of the references I sent her, although she looked up plenty of her own as well that were much better:
(These were 10490321, 3596259, 4723348 if you're interested)
She created the designs as a vector, and my other bridesmaid works at a company that happens to have a laser-cutting printer! So we made stamps with the designs by laser-cutting rubber, and glued it to a sheet of acrylic and foam backing (to help distribute the pressure when pressing down on the stamp). We tried stamping without the foam and it came out MUCH better with a foamie backing. We also didn't cut the design into the rubber deep enough, so we had to be extra careful when stamping the ink to avoid smudging. Super annoying!
(I have a picture of my bridesmaid staring at the laser printer as the stamp was being cut; I'll put it here tomorrow!)
Here are the five stamps that got created (the red & yellow is the foam backing).
Some words of advice on embossing:
1) Remember how I mentioned the pitfalls of using colored paper in the previous tutorial? The same applies for embossing as well as printing - the color of the embossing stamp ink and powder come out differently depending on your paper color (and probably paper type as well). So to get an exact shade, you have to practice with a lot of different colored inks and powders. In conclusion, if you have a choice, go with WHITE paper!
2) With embossing, you basically stamp on some slow-drying ink, cover it with embossing powder, brush off the excess powder, and heat blast the powder until it melts together. Slow-drying ink (PIGMENT ink) is required for this purpose because otherwise the ink will dry too quickly for the powder to catch on. People also recommend the combination of colored ink and transparent powder rather than the other way around (transparent ink and colored powder) because when the powder melts together, it doesn't always do so smoothly, especially if you don't have an ultra-fine powder. So you get left with tiny little bumps and "dents" in your design. Another reason is that you'll get excess powder clinging to the paper, and if the powder is clear, it's not really a problem. Since I used colored powder, I employed my lucky bridesmaids to take paintbrushes to the invitations and brush off the excess powder. Like so!
3) YES, you can achieve a very fine level of detail with embossing - pretty much exactly what you stamp onto the paper will come out in the embossing. I was skeptical of this at first, but trust me.. it's precise!
So what I ended up using was: for the blue emboss on the red paper, I used the Versamark watermark ink (transparent), and then Pastel Blue Stamp A Mania embossing powder to achieve the exact blue color. For the red emboss on blue paper, I wasn't so lucky, so the closest I got was using the Colormark pigment stamp in Scarlet with Judi Kins embossing powder in red - this yielded a darker, more blood red color on the blue paper, but I was past caring at this point. (This was, however, a better red than I got with transparent ink and colored powder, and other shades and brands of red pigment ink.)
There have been a ton of great embossing tutorials posted online, so I'll just link to a few that have documented it much better than I could: Heat Embossing on Weddingbee, How To Emboss in Weddingbee, Paper Source's How To videos.
Embossing is very easy, somewhat time consuming (but much less so if you use clear powder), but VERY worth it. They create a lovely raised design that add a lot of extra detail to your invitations, and your guests WILL notice. Walk into your local stamping store or Paper Source and they'll be happy to show you a demo! Beware though; you'll most likely walk out of there with tons of embossing supplies and make a lot more work for yourself.
After all the embossing, I smeared glue-stick on the back of the main invite and manually aligned it onto the pocketfold. The main invitation was cut to a particular dimension that would allow a consistent-width border around the edges.
Fin! (We wanted to emboss just about everything paper-related for the wedding, but after this ordeal I was pretty much over it!)
Thursday, March 18, 2010
Invitation Pocketfold Tutorial
How I Made My Invitations
We decided to design, cut, emboss, print, and assemble these entirely ourselves. Let me just say that it was an INCREDIBLE cost saver, but we got WAY overambitious and it ended up taking a looooooooooong time. I can't say it wasn't worth it, but it was a source of stress for awhile. =) So I don't really recommend this to anyone else.. but I do think our invitations kicked ass!
Before I start, a quick overview and retrospective:
1) We bought our raw paper supplies from Kelly Paper - I can't recommend them enough. They have these awesome warehouses where you can go in and feel/see the paper for yourself, and buy samples to take home. Their prices are unbeatable - I got 250 sheets of Astrobrights cover weight paper for $13!! You really can't beat that. So we bought all our paper here.
2) Be aware of the weight/size of your invitation! USPS charges different rates if something's square or over 1 ounce. I was able to use the regular 44 cent stamps out of pure luck - we were just below the limit and had decided to go with regular #10 envelopes (albeit in a bright color for variety).
3) Use colored paper wisely. It'll change the color of your ink when printing and when embossing.
4) Be aware of the fact that people rip envelopes and throw away invitations almost immediately. My heart was crushed when one of my roommates had got back from a Saturday wedding of a close friend, and by Sunday the invitation was already in the trash. It convinced me not to spend the extra money on a nice vellum envelope and too fancy paper. Good for my budget!
5) Give yourself a loooot of time for the invitations. They're more time-consuming than you think, even if you take an easier route!
The high level walkthrough of what we did:
1) Cut and folded our own pocketfolds. They're really expensive to buy, but super easy (and tedious) to fold yourself!
2) Created our own graphics. My bridesmaid designed these for us off a fire/water theme.
3) Created our own custom rubber stamps. My bridesmaid works at a company that has a laser cutting printer, so she had stamps made out of rubber for us, which was AMAZING! But we unfortunately cut the stamps too shallow into the rubber, so we ran into a lot of problems with ink smudges.
4) Embossed the designs. More on this later on the embossing walkthrough, but as fun as embossing is, it's also time-consuming (at least if you do it the way we did!)
--------------
Paper Supplies (all purchased from Kelly Paper): Cost total $78.27 (with a lot of extra to spare for table numbers, placecards, favor tags, thank you cards, and maybe even some extra to sell onto future brides)
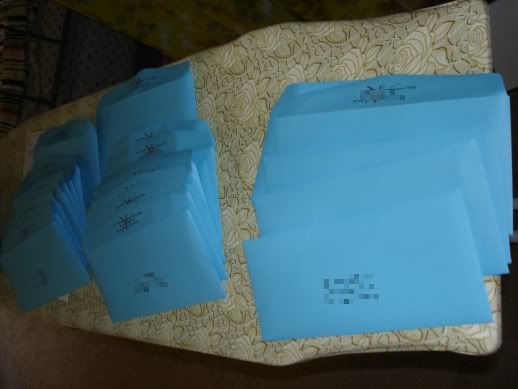
1) 250 sheets of Astrobright 65# coverweight paper in lunar blue in 8.5 x 11" to cut up for the inserts
2) 17 sheets of Mohawk Via Vellum 80# coverweight paper in scarlet in 26 x 40" to cut up for the pocketfolds
3) 500 Astrobright smooth finish lunar blue envelopes in #10 (standard envelope size)
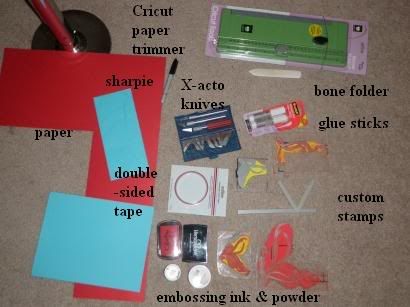
Tools: (purchased from Michaels and JoAnns)
1) Bone folder (OPTIONAL)
2) 1/4" doublesided tape
3) Ruler
4) Cricut portable paper trimmer with cutting and scoring blades
5) Color printer
6) Glue sticks
7) Sharpies & pencils
8) Patient and kind bridesmaids!
9) Scissors & exacto knife
Embossing Supplies:
1) Custom stamps
2) Red & blue embossing powder
3) Colorbox red pigment ink
4) Versamark watermark ink
5) Small brushes (to brush the extra powder off)
6) Tons of extra paper to catch embossing powder (hello, multitudes of Victoria's Secret catalogs!)
7) Heat gun
--------------
I took a lot of inspiration from many online resources, but the one that clinched it was Heather's DIY Pocketfolds walkthrough.
First I'll review how we made the pocketfolds. It's a bit long so I'll review the inserts and more embossing details in the next post.
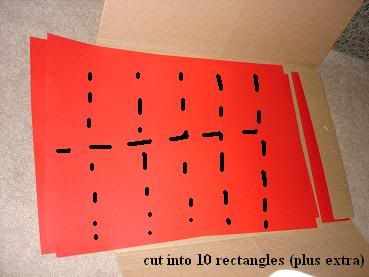
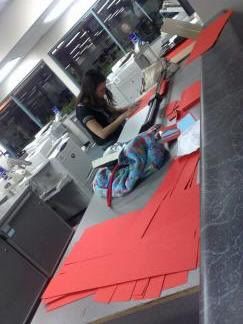
We started with the red paper for the pocketfolds, cutting it down from one huge 26 x 40" sheet to ten rectangles of 18.7 cm by 30.6 cm. (Sorry for the random unit switching! I just measured with whatever came out with a nicer measurement.) I snuck into numerous Kinko's around town and hogged their giant paper cutter for days and days! Kelly Paper also could do this for a nominal fee, but I was feeling cheap and decided to do it myself. In retrospect, they only charged $20 as a cutting fee, and I really should have just had them do it.. but oh well!
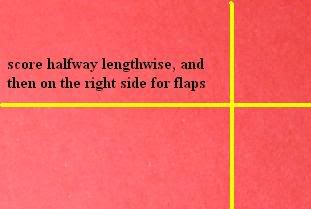
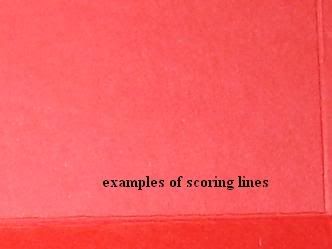
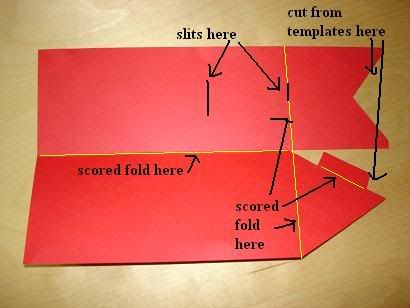
I then used the scoring blade on my paper trimmer and scored the paper in half lengthwise, and then 9.2cm from the right side for the flaps. Alternatively you can also use the ruler & bone folder to make the mark. This is just to make your fold cleaner and give you a guide on where to fold. I HIGHLY recommend this. If you take a thick coverweight piece of paper and fold it with and without scoring lines, you'll see the difference.
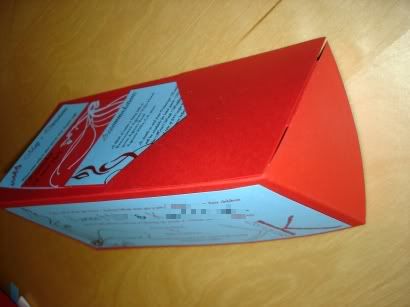
Then I made templates on how I wanted the pocket and closing flap to look like. These would be lined up against the right side (within the small area where we made the scoring line). We wanted the pocket that held the inserts to be an inverted triangle, and the closing flap to be another triangle that would both prop up the invitation as well as close the invitation (which is that extra rectangular piece on the blue template).
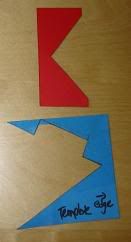
I traced the templates onto the red paper with a pencil, and cut!
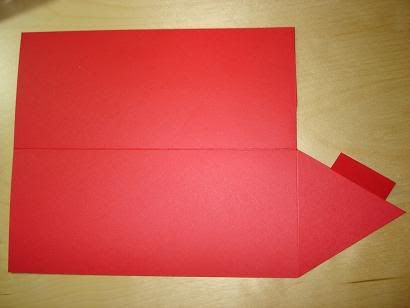
To yield this!
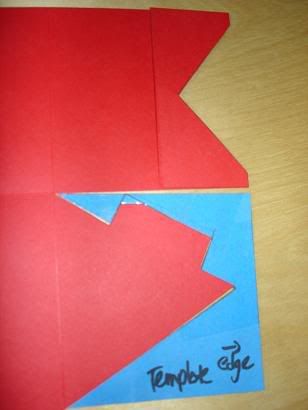
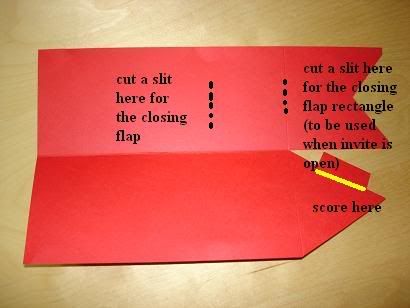
Then I folded the paper along the scoring lines, lengthwise and for each triangular piece. I also made an additional scoring line along the closing flap rectangle as that needed to be folded in. I also made two cuts with an X-acto knife to use as slots for inserting the closing flaps (this will make sense later). For this, I used the ruler as a cutting guide along with pencil marks to indicate where the cuts should be.
So at this point, this is what the pocketfold looked like:
For the side with the inverted triangle cut out, I used the double-sided tape to tape it closed. (I actually was unable to find 1/8" thickness doublesided tape, so I just cut the 1/4" tape in half. I actually wouldn't recommend this tape.. it held just fine when we were working with it, but once we put the inserts in, they started popping open! I would perhaps recommend some sort of glue if you can get it precise enough.)
My friend made me an oversized K stamp, which I dipped into the watermark ink and embossed with blue powder.
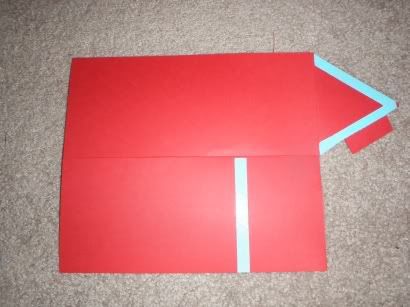
I also drew a black arrow onto the closing flap rectangle so guests would understand that there was a purpose for it! (I also put pictures on the wedding website of the invitation propped up.) I glued on the main invitation and slipped in the inserts (more on how the inserts were made in the next tutorial).
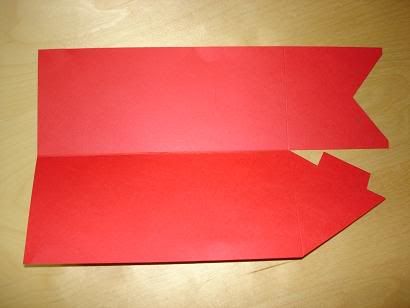
To close the invitation, you fold the invitation in half lengthwise, and then take the triangular flap sticking out and insert the top of the triangle into the slit we cut into the middle of the pocketfolder. And then you get a K! (Both me and my husband's first names start with a K.)
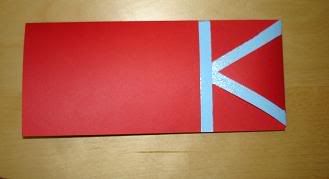
And when you open it and insert the flap, the invitation stands on its own!
Then we printed the addresses on the blue envelopes and our return address on the back flap (no handwriting the addresses for this bride!) and off they went!
Credits:
- Bridesmaid CK for laser-cutting the K stamp for me (more details on the stamp making in the insert tutorial)
- Kelly Paper for their awesome paper, prices, and service
- Bride & Groom for designing the pocketfolds
- Michael's, JoAnn's, Paper Source, and Stampin' From the Heart (Culver City) for embossing demos and supplies (more details on the embossing in the insert tutorial)
We decided to design, cut, emboss, print, and assemble these entirely ourselves. Let me just say that it was an INCREDIBLE cost saver, but we got WAY overambitious and it ended up taking a looooooooooong time. I can't say it wasn't worth it, but it was a source of stress for awhile. =) So I don't really recommend this to anyone else.. but I do think our invitations kicked ass!
Before I start, a quick overview and retrospective:
1) We bought our raw paper supplies from Kelly Paper - I can't recommend them enough. They have these awesome warehouses where you can go in and feel/see the paper for yourself, and buy samples to take home. Their prices are unbeatable - I got 250 sheets of Astrobrights cover weight paper for $13!! You really can't beat that. So we bought all our paper here.
2) Be aware of the weight/size of your invitation! USPS charges different rates if something's square or over 1 ounce. I was able to use the regular 44 cent stamps out of pure luck - we were just below the limit and had decided to go with regular #10 envelopes (albeit in a bright color for variety).
3) Use colored paper wisely. It'll change the color of your ink when printing and when embossing.
4) Be aware of the fact that people rip envelopes and throw away invitations almost immediately. My heart was crushed when one of my roommates had got back from a Saturday wedding of a close friend, and by Sunday the invitation was already in the trash. It convinced me not to spend the extra money on a nice vellum envelope and too fancy paper. Good for my budget!
5) Give yourself a loooot of time for the invitations. They're more time-consuming than you think, even if you take an easier route!
The high level walkthrough of what we did:
1) Cut and folded our own pocketfolds. They're really expensive to buy, but super easy (and tedious) to fold yourself!
2) Created our own graphics. My bridesmaid designed these for us off a fire/water theme.
3) Created our own custom rubber stamps. My bridesmaid works at a company that has a laser cutting printer, so she had stamps made out of rubber for us, which was AMAZING! But we unfortunately cut the stamps too shallow into the rubber, so we ran into a lot of problems with ink smudges.
4) Embossed the designs. More on this later on the embossing walkthrough, but as fun as embossing is, it's also time-consuming (at least if you do it the way we did!)
--------------
Paper Supplies (all purchased from Kelly Paper): Cost total $78.27 (with a lot of extra to spare for table numbers, placecards, favor tags, thank you cards, and maybe even some extra to sell onto future brides)
1) 250 sheets of Astrobright 65# coverweight paper in lunar blue in 8.5 x 11" to cut up for the inserts
2) 17 sheets of Mohawk Via Vellum 80# coverweight paper in scarlet in 26 x 40" to cut up for the pocketfolds
3) 500 Astrobright smooth finish lunar blue envelopes in #10 (standard envelope size)
Tools: (purchased from Michaels and JoAnns)
1) Bone folder (OPTIONAL)
2) 1/4" doublesided tape
3) Ruler
4) Cricut portable paper trimmer with cutting and scoring blades
5) Color printer
6) Glue sticks
7) Sharpies & pencils
8) Patient and kind bridesmaids!
9) Scissors & exacto knife
Embossing Supplies:
1) Custom stamps
2) Red & blue embossing powder
3) Colorbox red pigment ink
4) Versamark watermark ink
5) Small brushes (to brush the extra powder off)
6) Tons of extra paper to catch embossing powder (hello, multitudes of Victoria's Secret catalogs!)
7) Heat gun
--------------
I took a lot of inspiration from many online resources, but the one that clinched it was Heather's DIY Pocketfolds walkthrough.
First I'll review how we made the pocketfolds. It's a bit long so I'll review the inserts and more embossing details in the next post.
We started with the red paper for the pocketfolds, cutting it down from one huge 26 x 40" sheet to ten rectangles of 18.7 cm by 30.6 cm. (Sorry for the random unit switching! I just measured with whatever came out with a nicer measurement.) I snuck into numerous Kinko's around town and hogged their giant paper cutter for days and days! Kelly Paper also could do this for a nominal fee, but I was feeling cheap and decided to do it myself. In retrospect, they only charged $20 as a cutting fee, and I really should have just had them do it.. but oh well!
I then used the scoring blade on my paper trimmer and scored the paper in half lengthwise, and then 9.2cm from the right side for the flaps. Alternatively you can also use the ruler & bone folder to make the mark. This is just to make your fold cleaner and give you a guide on where to fold. I HIGHLY recommend this. If you take a thick coverweight piece of paper and fold it with and without scoring lines, you'll see the difference.
Then I made templates on how I wanted the pocket and closing flap to look like. These would be lined up against the right side (within the small area where we made the scoring line). We wanted the pocket that held the inserts to be an inverted triangle, and the closing flap to be another triangle that would both prop up the invitation as well as close the invitation (which is that extra rectangular piece on the blue template).
I traced the templates onto the red paper with a pencil, and cut!
To yield this!
Then I folded the paper along the scoring lines, lengthwise and for each triangular piece. I also made an additional scoring line along the closing flap rectangle as that needed to be folded in. I also made two cuts with an X-acto knife to use as slots for inserting the closing flaps (this will make sense later). For this, I used the ruler as a cutting guide along with pencil marks to indicate where the cuts should be.
So at this point, this is what the pocketfold looked like:
For the side with the inverted triangle cut out, I used the double-sided tape to tape it closed. (I actually was unable to find 1/8" thickness doublesided tape, so I just cut the 1/4" tape in half. I actually wouldn't recommend this tape.. it held just fine when we were working with it, but once we put the inserts in, they started popping open! I would perhaps recommend some sort of glue if you can get it precise enough.)
My friend made me an oversized K stamp, which I dipped into the watermark ink and embossed with blue powder.
I also drew a black arrow onto the closing flap rectangle so guests would understand that there was a purpose for it! (I also put pictures on the wedding website of the invitation propped up.) I glued on the main invitation and slipped in the inserts (more on how the inserts were made in the next tutorial).
To close the invitation, you fold the invitation in half lengthwise, and then take the triangular flap sticking out and insert the top of the triangle into the slit we cut into the middle of the pocketfolder. And then you get a K! (Both me and my husband's first names start with a K.)
And when you open it and insert the flap, the invitation stands on its own!
Then we printed the addresses on the blue envelopes and our return address on the back flap (no handwriting the addresses for this bride!) and off they went!
Credits:
- Bridesmaid CK for laser-cutting the K stamp for me (more details on the stamp making in the insert tutorial)
- Kelly Paper for their awesome paper, prices, and service
- Bride & Groom for designing the pocketfolds
- Michael's, JoAnn's, Paper Source, and Stampin' From the Heart (Culver City) for embossing demos and supplies (more details on the embossing in the insert tutorial)
Subscribe to:
Posts (Atom)